
You can now run predefined workflows when a system event happens. Each automation starts with a trigger, then runs up to three steps automatically.
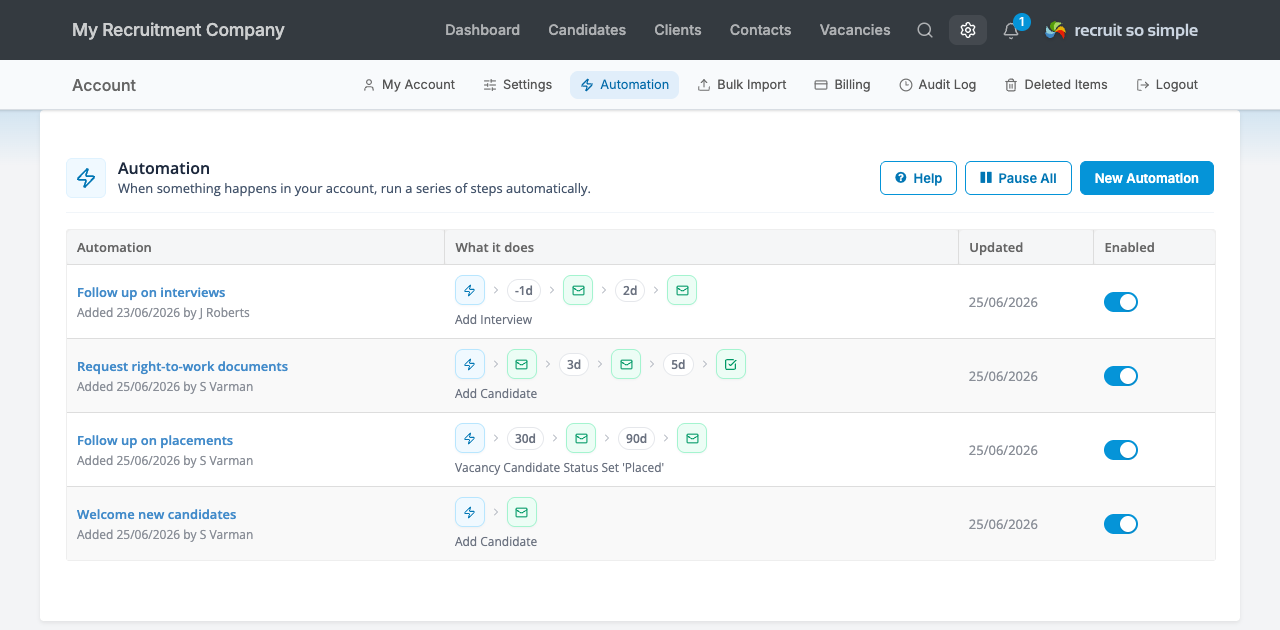
For example, add sequenced actions to the ‘Add Interview’ trigger. This might be an interview reminder email for the candidate a day before the interview, a task for a consultant, and a follow email after the interview.
Choose a trigger, choose a reference date and add up to 3 actions:
- Send email or SMS
- Notify a system user
- Create a task, note or journal
- Set a status for the target record
- Add a record to a group
- Add or remove a tag(s)
Status indicators
The main Automation page shows a status dot beside each automation. Grey means disabled, blue means enabled, and green means active with pending steps to run.
How automations are set up
Open Settings > Automation, then select New Automation. You can start from a template or build from scratch. New automations start switched off for review.
Each automation has four setup areas:
- When – name the automation and choose the trigger.
- Steps – add up to three actions and choose when each step should run.
- Rules – decide whether communication should stay inside working hours* or only run for tagged records.
- Review – check the full sequence before enabling it.
*You can set your working hours in [Settings > Company Details]. This will prevent your automated email and SMS messages being sent outside working hours and days.
Triggers
Automations can start from a range of system events, including adding new candidates, contacts, clients or vacancies, interview events, vacancy open or closed events, Do Not Contact changes, record status changes, and vacancy pipeline status changes.
Merge Fields
When creating email and SMS templates, merge fields are available to insert names and other details. Available merge fields will depend on which trigger is selected for the automation.
For interview-related events, the Job Description merge field will insert the job description text from the Job Description (Website) field on the vacancy record’s Details screen.
Attachments
You can add attachments to an automated email as part of the template.
Step timing and condistions
Each step can run immediately or after a delay. Delays can be set in minutes, hours, days, weeks, or months, up to a maximum of 12 months after the trigger. You can also set an optional time of day, such as 09:00, for delayed steps.
When adding a delay to an action, you can choose to skip the step if the recipient replies to any email in this automation.
Some automation steps can use the candidate’s placement start date as a reference point. Enter a negative value to run the step before the start date. For example, -1 day to send a reminder the day before the candidate starts. This is available for:
- Add Interview
- Interview date change
- Pipeline status changed to Placed
Important: Reply-based email conditions require that your Recruit So Simple inbox is synced with your email (Auto-Journaling or Microsoft 365 with journaling enabled). Without this, the automation cannot detect whether an email has been replied to, so these conditions will behave as Always run.
Step types
Send Email
Sends an email to the trigger recipient or a custom email address, depending on the trigger. Configure the recipient, subject, message, optional attachments, timing, and condition.
Email messages support merge fields such as candidate reference, candidate first name, candidate last name, and date added. Attachments upload when selected and are sent every time that step runs. Each file can be up to 10MB, with the whole email up to 20MB.
Send SMS
Sends an SMS to the recipient available for the trigger. Configure the message, timing, and condition.
SMS messages support the merge fields available for the trigger, for example, interview details for the Add Interview trigger. The editor shows a character counter. One SMS credit is deducted per 150 characters, so allow extra space for merged data such as names or references.
Notify User
Creates an internal alert – choose a user in your organisation, or the user who triggered the event.
Configure the notification message, timing, and condition. Alerts are intended to be short and support one merge field.
Create Task
Creates a task linked to the available record, such as the candidate in a candidate-based automation. Configure the task subject, owner, due date, optional reminder, details, timing, and condition.
The owner can be the user who triggered the event or a specific user. Due dates and reminder offsets can be set in days, weeks, months, or years. Task details support merge fields available for the chosen trigger.
Add Note
Adds a note to the available record. Choose which record to add the note to, note text, timing, and condition.
Add Journal
Adds a journal entry to the available record. Choose which record to add the journal to, subject, journal type, owner, journal text, timing, and condition.
Journal text supports merge fields, and you can type @ to mention a user so they are notified when the journal is added.
Set Candidate Status
Changes the candidate status when the automation runs. Configure the target status, timing, and condition.
Add to Group
Adds the record to a selected group. Choose the target group, timing, and condition.
Add Tag
Applies one or more tags to the available record. Configure the record target, tag category and tag selection, timing, and condition.
Remove Tag
Removes one or more tags from the available record. Choose the target record, tag category and tag selection, timing, and condition.
If a step references a status, tag or other item that has since been deleted, that step will be skipped. The remaining steps will continue to run. A warning will be shown on the Automation page so you can review and update the affected automation.
Rules and safeguards
In Rules, you can limit email and SMS steps to company working hours. You can add your working hours in [Settings > Company Details].
You can also limit an automation to records with selected tags. Email and SMS steps never deliver to records flagged Do Not Contact, even if the automation rules would otherwise allow them.
Managing automations
Open an automation and select History to see recent runs, active runs, steps run, and emails sent. Pending runs are shown in the history list, including the record and vacancy they relate to.
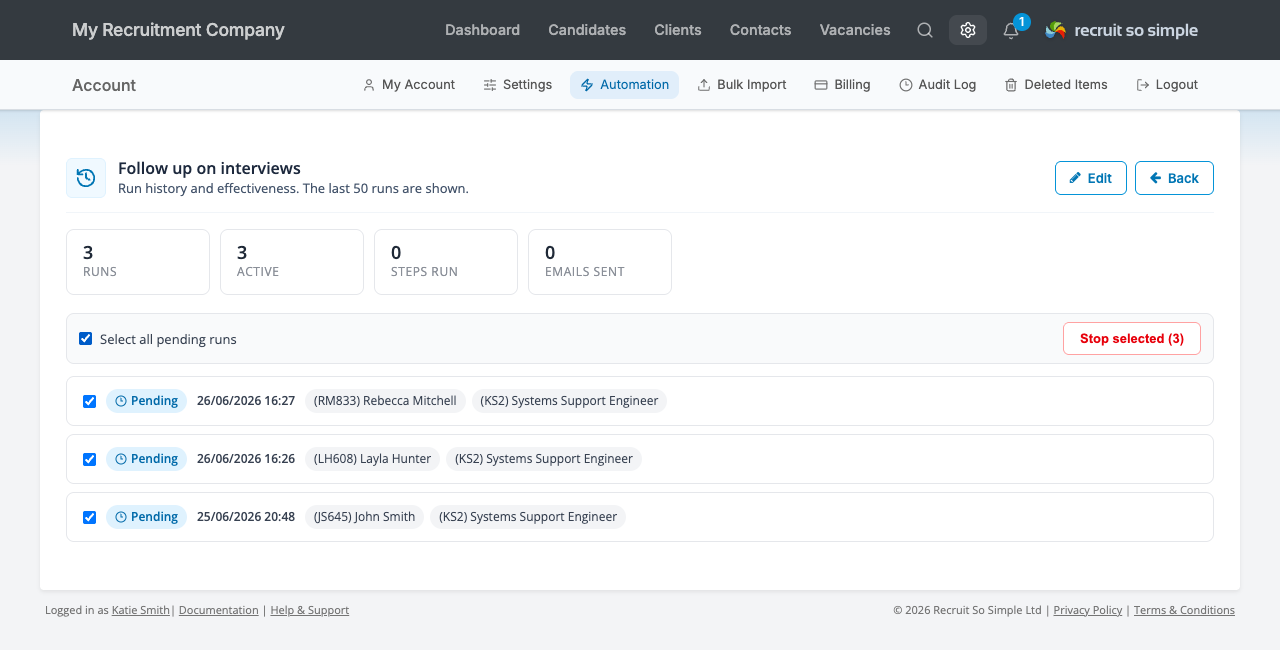
To stop several pending runs at once, tick the runs you want to stop, or use Select all pending runs, then select Stop selected.
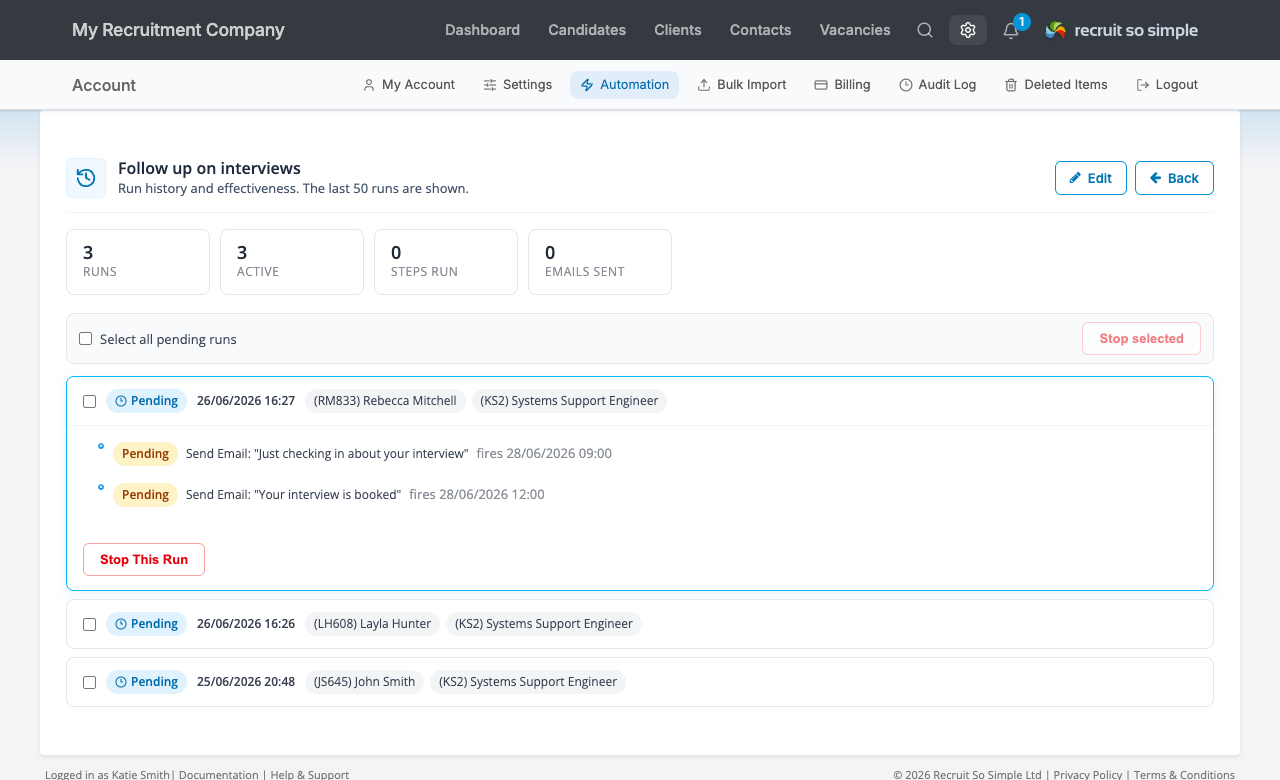
Open a pending run to see the steps still waiting to run. Use Stop This Run to stop that run only. Stopping a pending run prevents any remaining steps in that run from firing.
Review and enable
Use Review to check the trigger, steps, timing, and readiness before enabling the automation. The review screen highlights issues such as missing email subjects or messages and warns of any other potential issues.
When the automation is enabled, it runs whenever its trigger fires. Use the automation history to review what has run.