
Settings > Bulk Import
Clients and contacts can be imported via a spreadsheet saved in .csv format.
Clients, contacts and sites
Client – A client is the company.
Contact – One contact (person) can be set as the main contact for each client. This is important when sending a bulk email to clients – you can choose whether to send to all contacts for the selected clients, or only to the main contact.
To appear in postcode and location searches, the contact must be attached to a site. By default, when adding new clients and contacts, the contact is attached to the main site address.
UK postcodes and US ZIP Codes are supported.
Sites – A site is the physical address of a client. Additional sites can be added after the import. Each site can be given a name to make it easy to identify (e.g. Main Site, Sussex Site). Sites provide the location – the site’s County (default) or City, when adding vacancies.
Bulk importing your clients
You must import clients before importing contacts. This ensures each company is created with its details and main site address. Additional sites can be added later from the client record’s Sites page.
If your clients and contacts are in the same CSV file: import the file once to create the clients. Import the same file again to add the contacts.
You can download example CSV files from the import screen to compare with your own. If you use the same column headings as in our example files, the system can automatically match your data. If your headings differ, you can adjust the mappings manually during import.
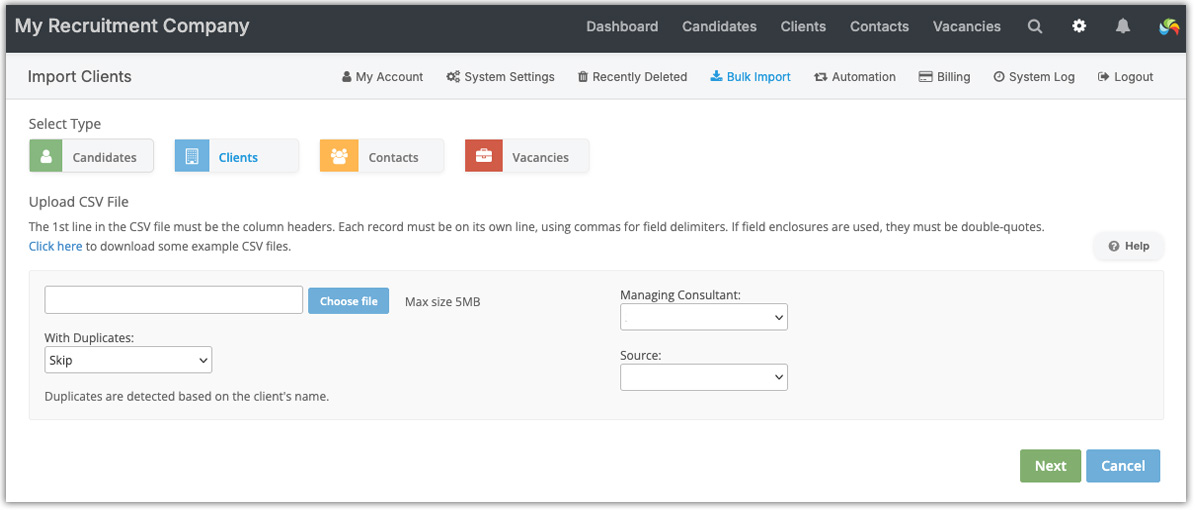
Step 1: On the Bulk Import screen, select Clients from the buttons at the top.
Step 2: Locate and select your CSV file (maximum size 5MB).
Step 3: Choose how to handle duplicates (by company name):
- Skip (default): Ignore duplicates and skip them.
- Overwrite: Replace any existing record with the data from your CSV file.
- Duplicate: Add a new record, even if a client with the same name already exists.
Step 4: (Optional) select the managing consultant and the source for the imported clients. Client sources can be added in [Settings > System Settings > Fields > Client Sources].
Step 5: Click Next to move to the Field Mappings screen:
Field mappings
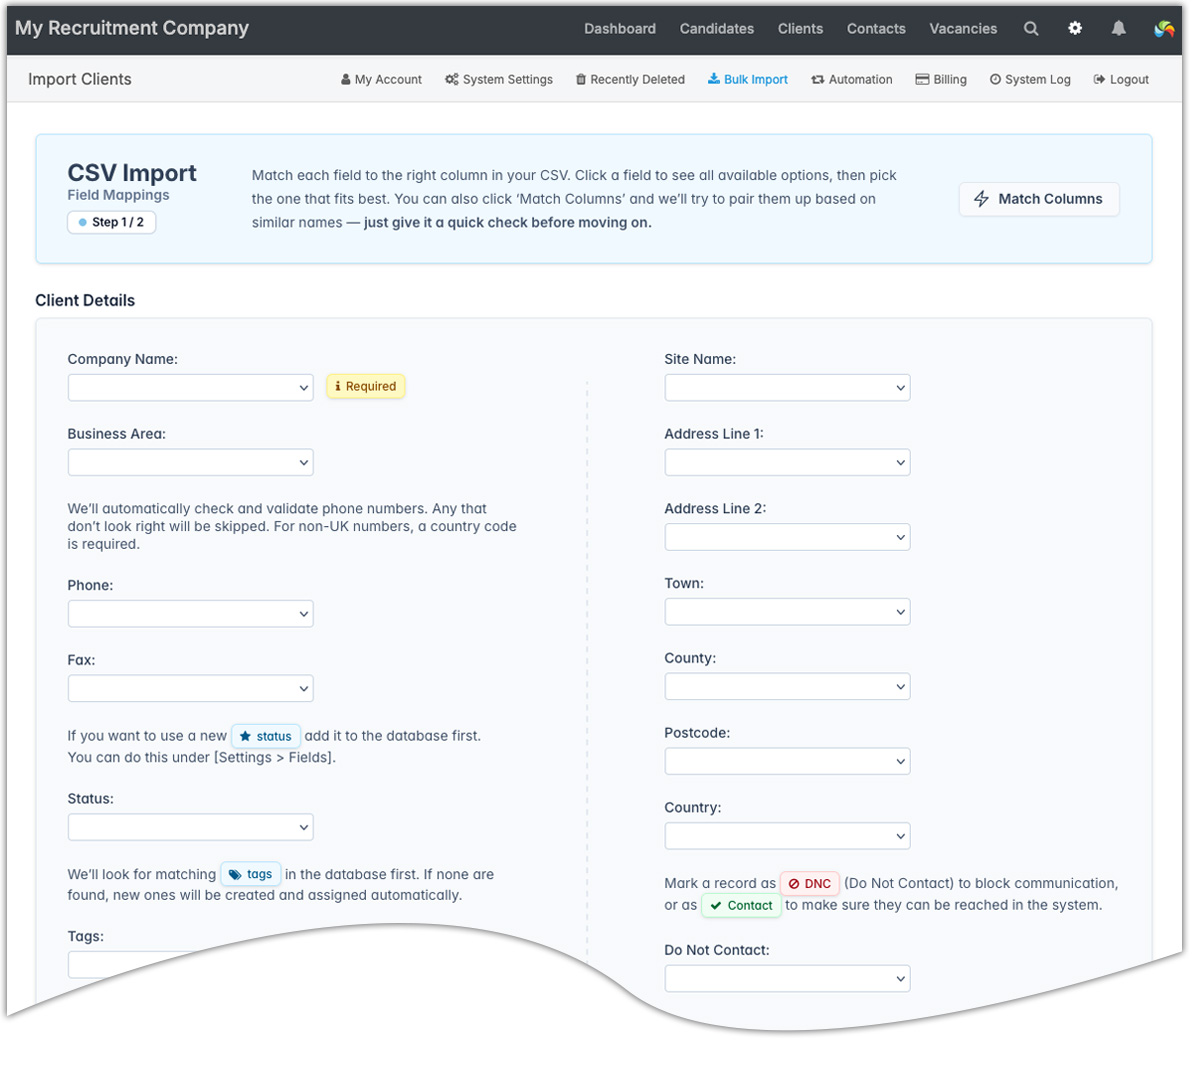
On the Field Mappings screen, you’ll match the columns in your CSV file with the correct fields in the database.
To do this automatically, click the Match Columns button. Review the suggested matches carefully, and make any adjustments where needed before continuing.
You can also match columns manually by selecting the appropriate field for each column.
When you’re ready, click Import located at the bottom.
Bulk importing your Contacts
The process for importing contacts is the same as for clients.
If your CSV contains both clients and contacts, after importing your clients, re-import the same file after selecting Contacts from the buttons at the top of the screen.
Required fields
- For clients: Company name
- For Contacts: Company name, Forenames, Surname
All other fields are optional. Unmatched columns are ignored (no changes made). Empty cells are ignored (no changes made).
Optional fields (Clients)
Business Area – these must be set up in [Settings > System Settings > Fields > Business Areas] before the import.
Site Name – used when overwriting existing records to indicate which address should be modified. For new clients, this can be ignored.
Optional fields (Contacts)
Site – choose which client site (site name) the contact should belong to for existing clients. When importing new clients/contacts, this can be ignored.
Use Client’s Main Site – enabled by default. Attaches the contact to the client’s main address, making them searchable by that site’s postcode/location.
Main Contact – in a column in your CSV use the word Main to mark that person as the client’s primary contact.
Phone (preferred) – enter Mobile or Phone to set the preferred number shown on the contact’s record.
Optional fields (common to both Client and Contacts)
Social Media – accepts either a full URL or a handle (e.g. @JohnSmith).
Notes – free text field. You can assign any column to Notes, useful for importing miscellaneous information.
Tags – add multiple tags separated by commas. If a tag doesn’t already exist, it will be created automatically and placed in a category named Import.
Status – new records default to Active unless another status is specified. Statuses must be pre-set in [Settings > System Settings > Fields > Clients/Contacts Statuses].
Do Not Contact (DNC) – enter either DNC or Contact. Empty cells or if the column is not used, the candidate will be contactable. If a client is set to DNC, all of its contacts will also be blocked from messaging (email, SMS), regardless of their individual setting.