
The Client Portal provides client contacts with a secure login where they can review candidates (candidates are shared anonymously), see upcoming interviews, and upload documents. Candidates can be flagged as Approve, Maybe or Reject, and the contact can also leave a comment.
You control which candidates and interviews to share, and can set rules for what contacts can see.
Important: Before you can use the Client Portal, you must first add your branding, along with links to your website, Privacy Policy and Terms & Conditions. You can do this from [Settings > Branding].
Contents
- Client portal at a glance
- Quick Start
- Client Portal Settings
- Inviting Contacts to the Portal
- Client record’s Portal screen
- Contact record’s Portal screen
- Vacancy record’s Portal screen
- Vacancy record’s Pipeline screen
- Automation
- Follow records to receive portal activity alerts
Client Portal at a Glance
Client Portal Settings
Choose which portal features are available, and customise your portal invite messages in [Settings > Client Portal].
Client record (Portal tab)
See which contacts have access to the Client Portal, remove access if needed, and review an overview of portal activity.
Contact record (Portal tab)
Invite a contact to the Client Portal, remove their access, and review their portal activity.
Vacancy record (Portal tab)
See which contacts have access to the vacancy and how many candidates and interviews have been shared with them. You can also set sharing rules, review portal activity and remove access.
Vacancy record (Pipeline)
Choose which candidates to share and which contacts to share them with. You can also see each contact’s decisions, comments and feedback.
Dashboard (Portal)
Review Client Portal activity across your database.
Quick Start
- Add your branding in [Settings > Branding]. Your branding is used throughout the Client Portal, and Candidate Portal.
- Enable the Client Portal in [Settings > Client Portal].
- Invite a contact by sending them a portal link. You can do this from the contact record’s Portal tab, or from the client record’s Contacts tab.
- Share a candidate with a selected contact from the vacancy record’s Pipeline tab.
- Set the sharing rule for each contact from the vacancy record’s Portal tab. You can choose to share selected items, selected candidates, or everything (see sharing rules below).
- Review feedback from the contact on the vacancy record’s Pipeline tab, including their decision and any comments they have left.
Client Portal Settings
[Settings > Client Portal]
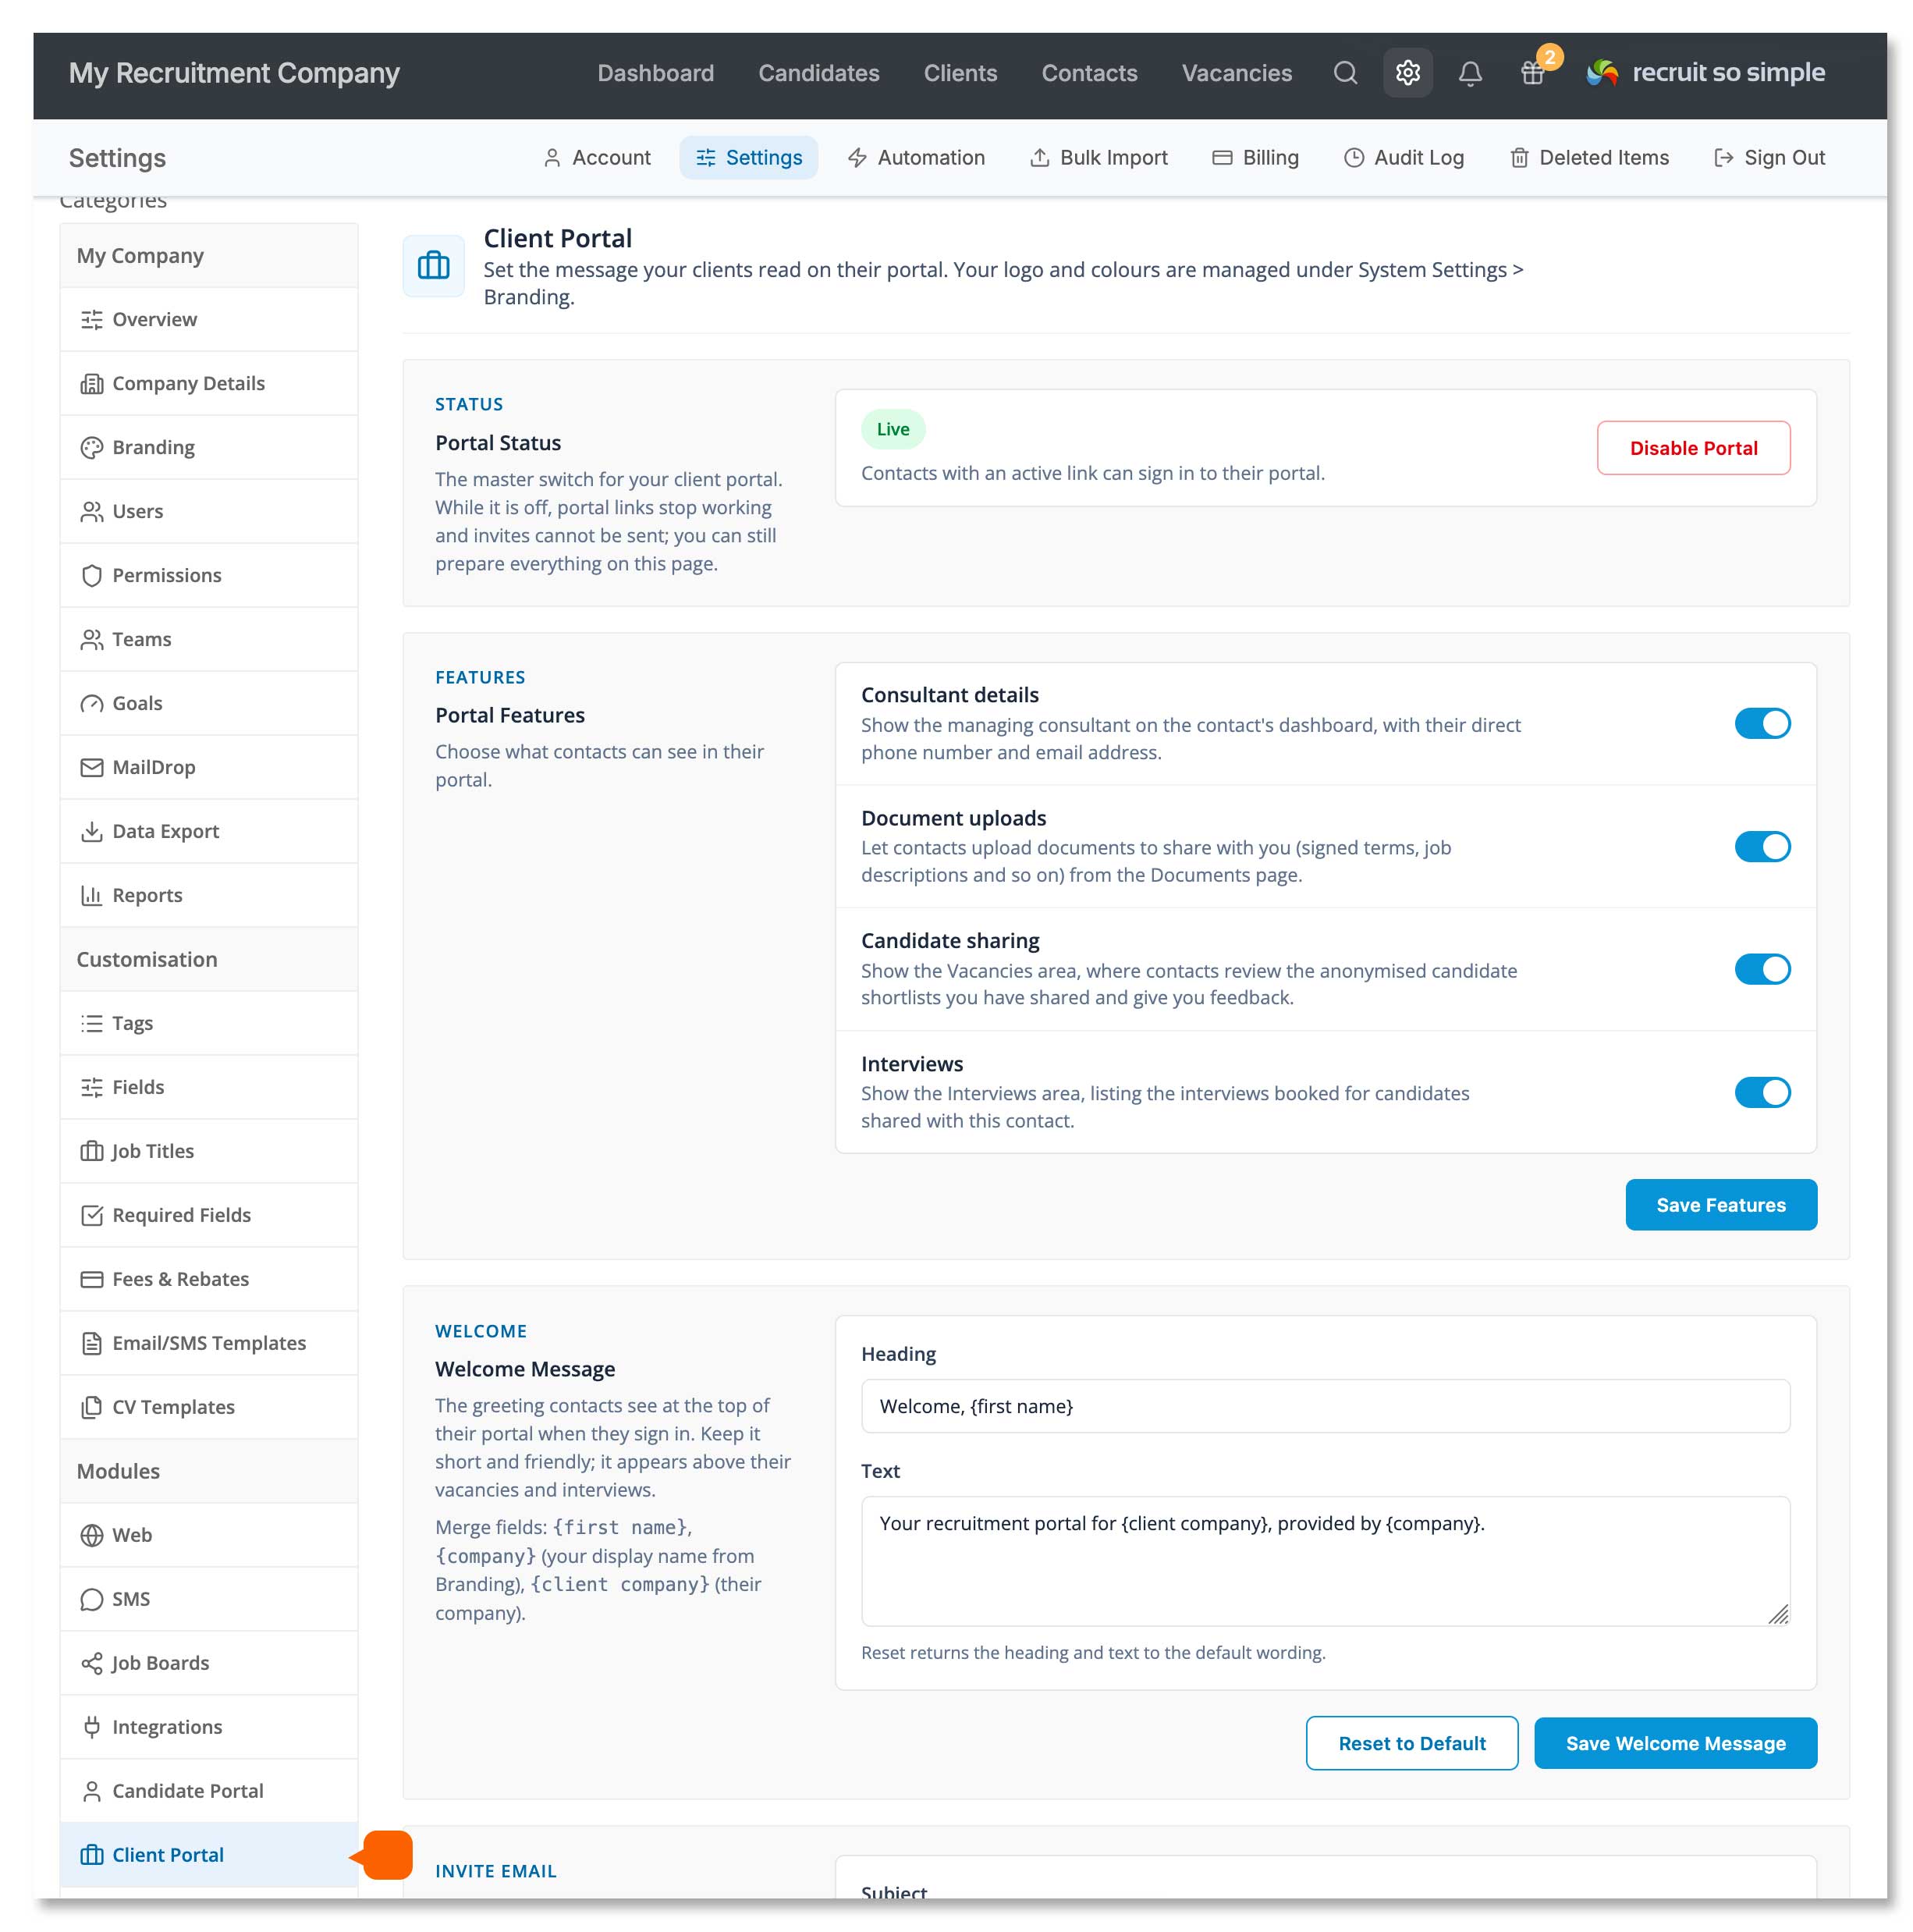
Status
Enable or disable the Client Portal globally. When disabled, contacts will not be able to access their portal.
Portal Features
Choose which features and information are available to contacts in the Client Portal.
You can:
- Show or hide the managing consultant’s contact details on the portal dashboard.
- Show or hide the Vacancies section.
- Show or hide the Interviews section.
- Show or hide the Document Upload option.
Welcome Message
Customise the message contacts see at the top of their portal dashboard after logging in.
Invite Email
Customise the invitation email sent when you invite a contact to the Client Portal. The email includes their portal access link.
Inviting Contacts to the Portal
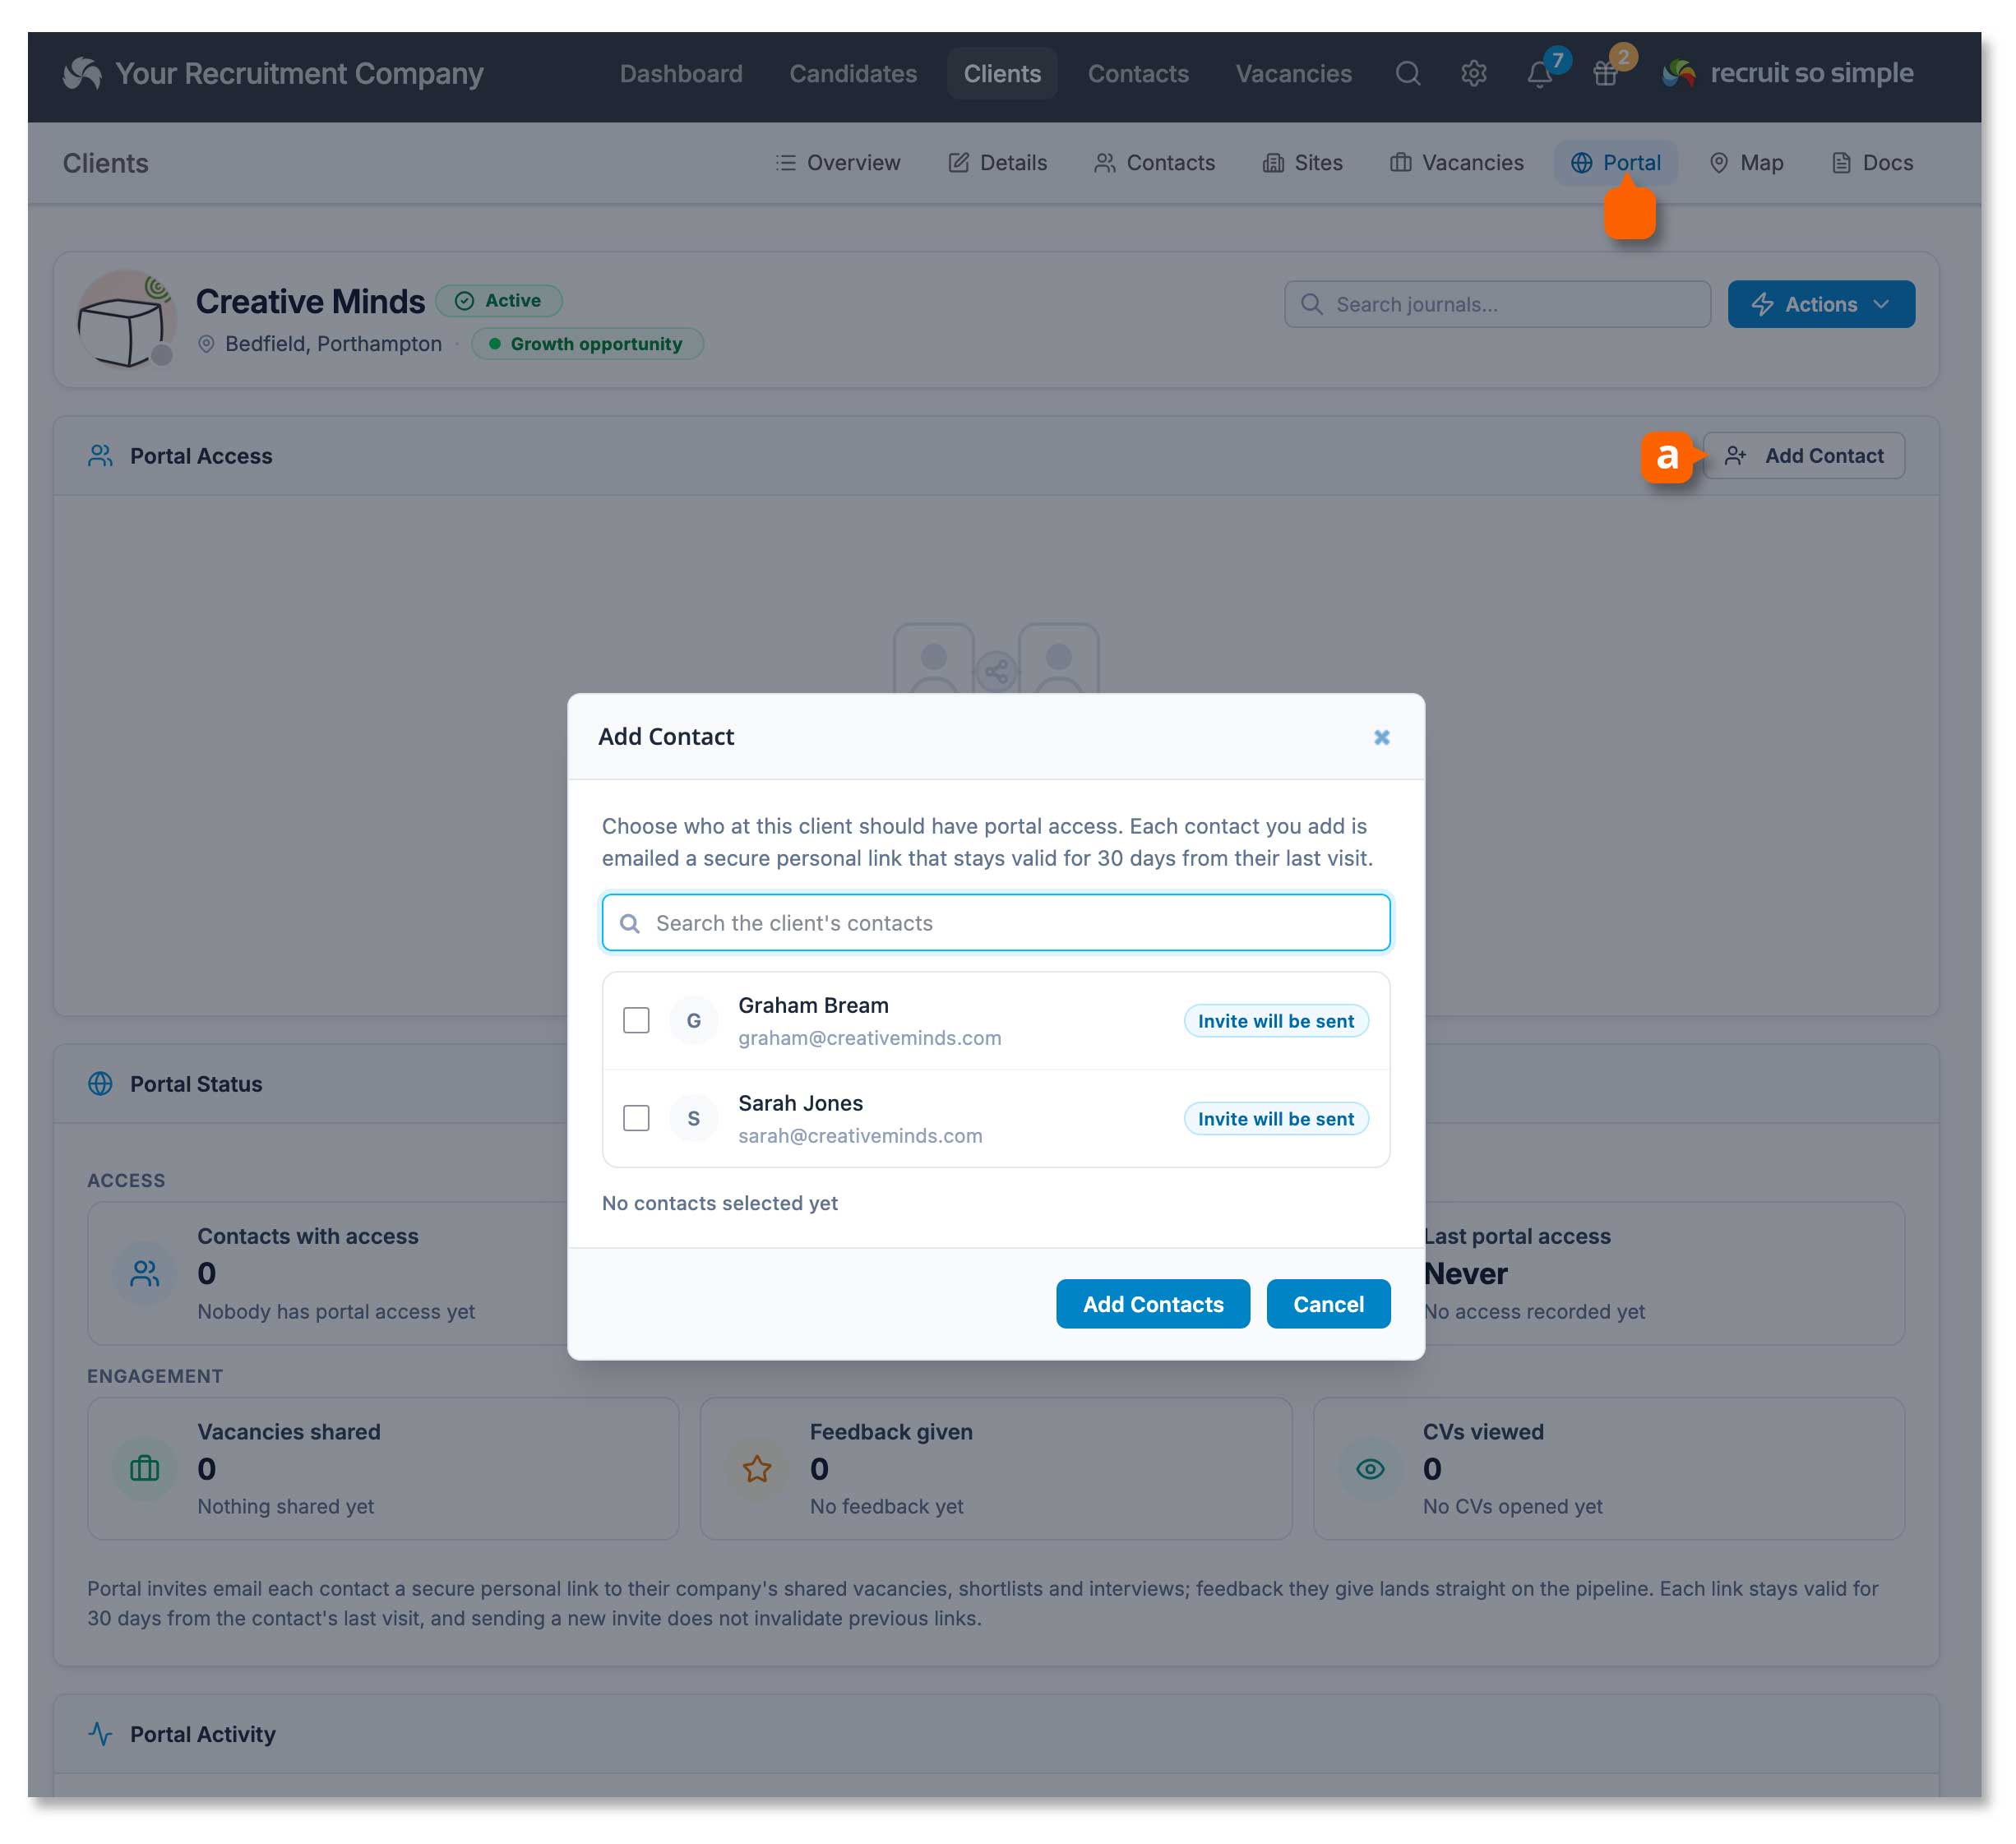
You can invite contacts to the Client Portal in any of the following ways:
- Click Add Contact [a] from the client record’s Portal tab.
- Click Send Link from the client record’s Contacts tab.
- Click Send Portal Link from the contact record’s Portal tab.
Portal invitation links can be sent immediately or scheduled to send at a later date and time.
Client record’s Portal screen
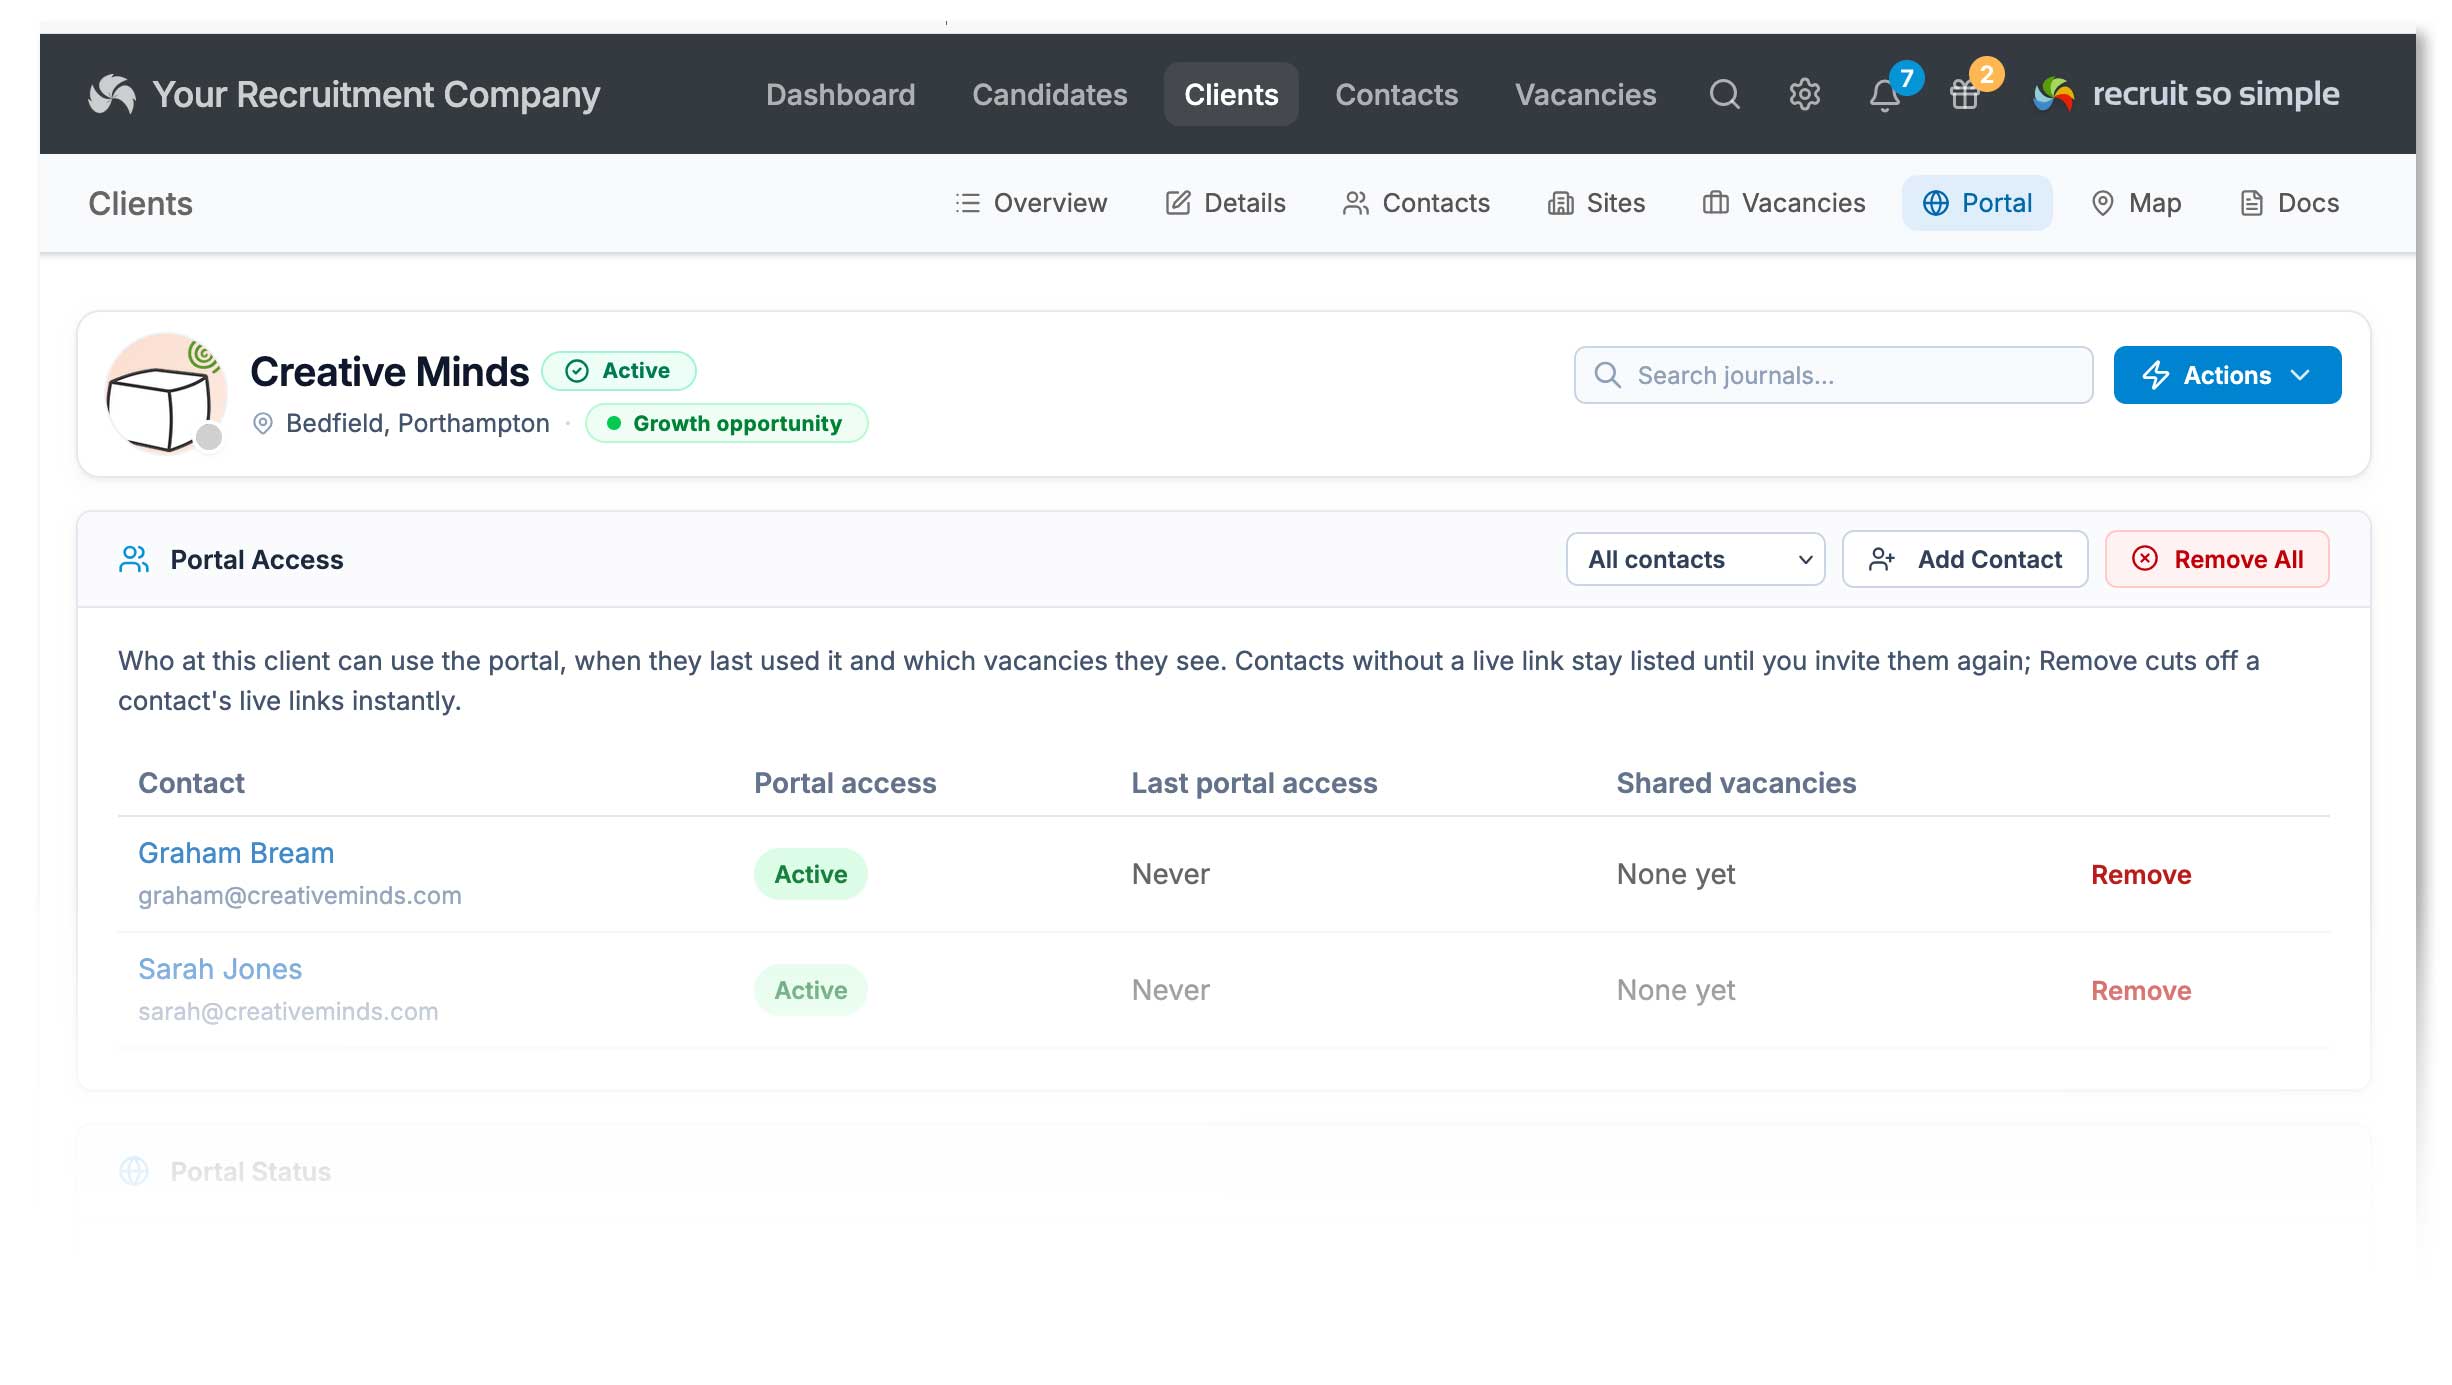
The client record’s Portal tab includes useful tools for managing access and reviewing Client Portal activity across the client.
Portal Access, Status and Activity
See which contacts have portal access, when they last accessed the portal, and which vacancies have been shared with them. You can also remove a contact’s portal access if needed.
The activity summary shows how many CVs have been viewed, how much feedback has been given, and how many vacancies have been shared.
Contact record’s Portal screen
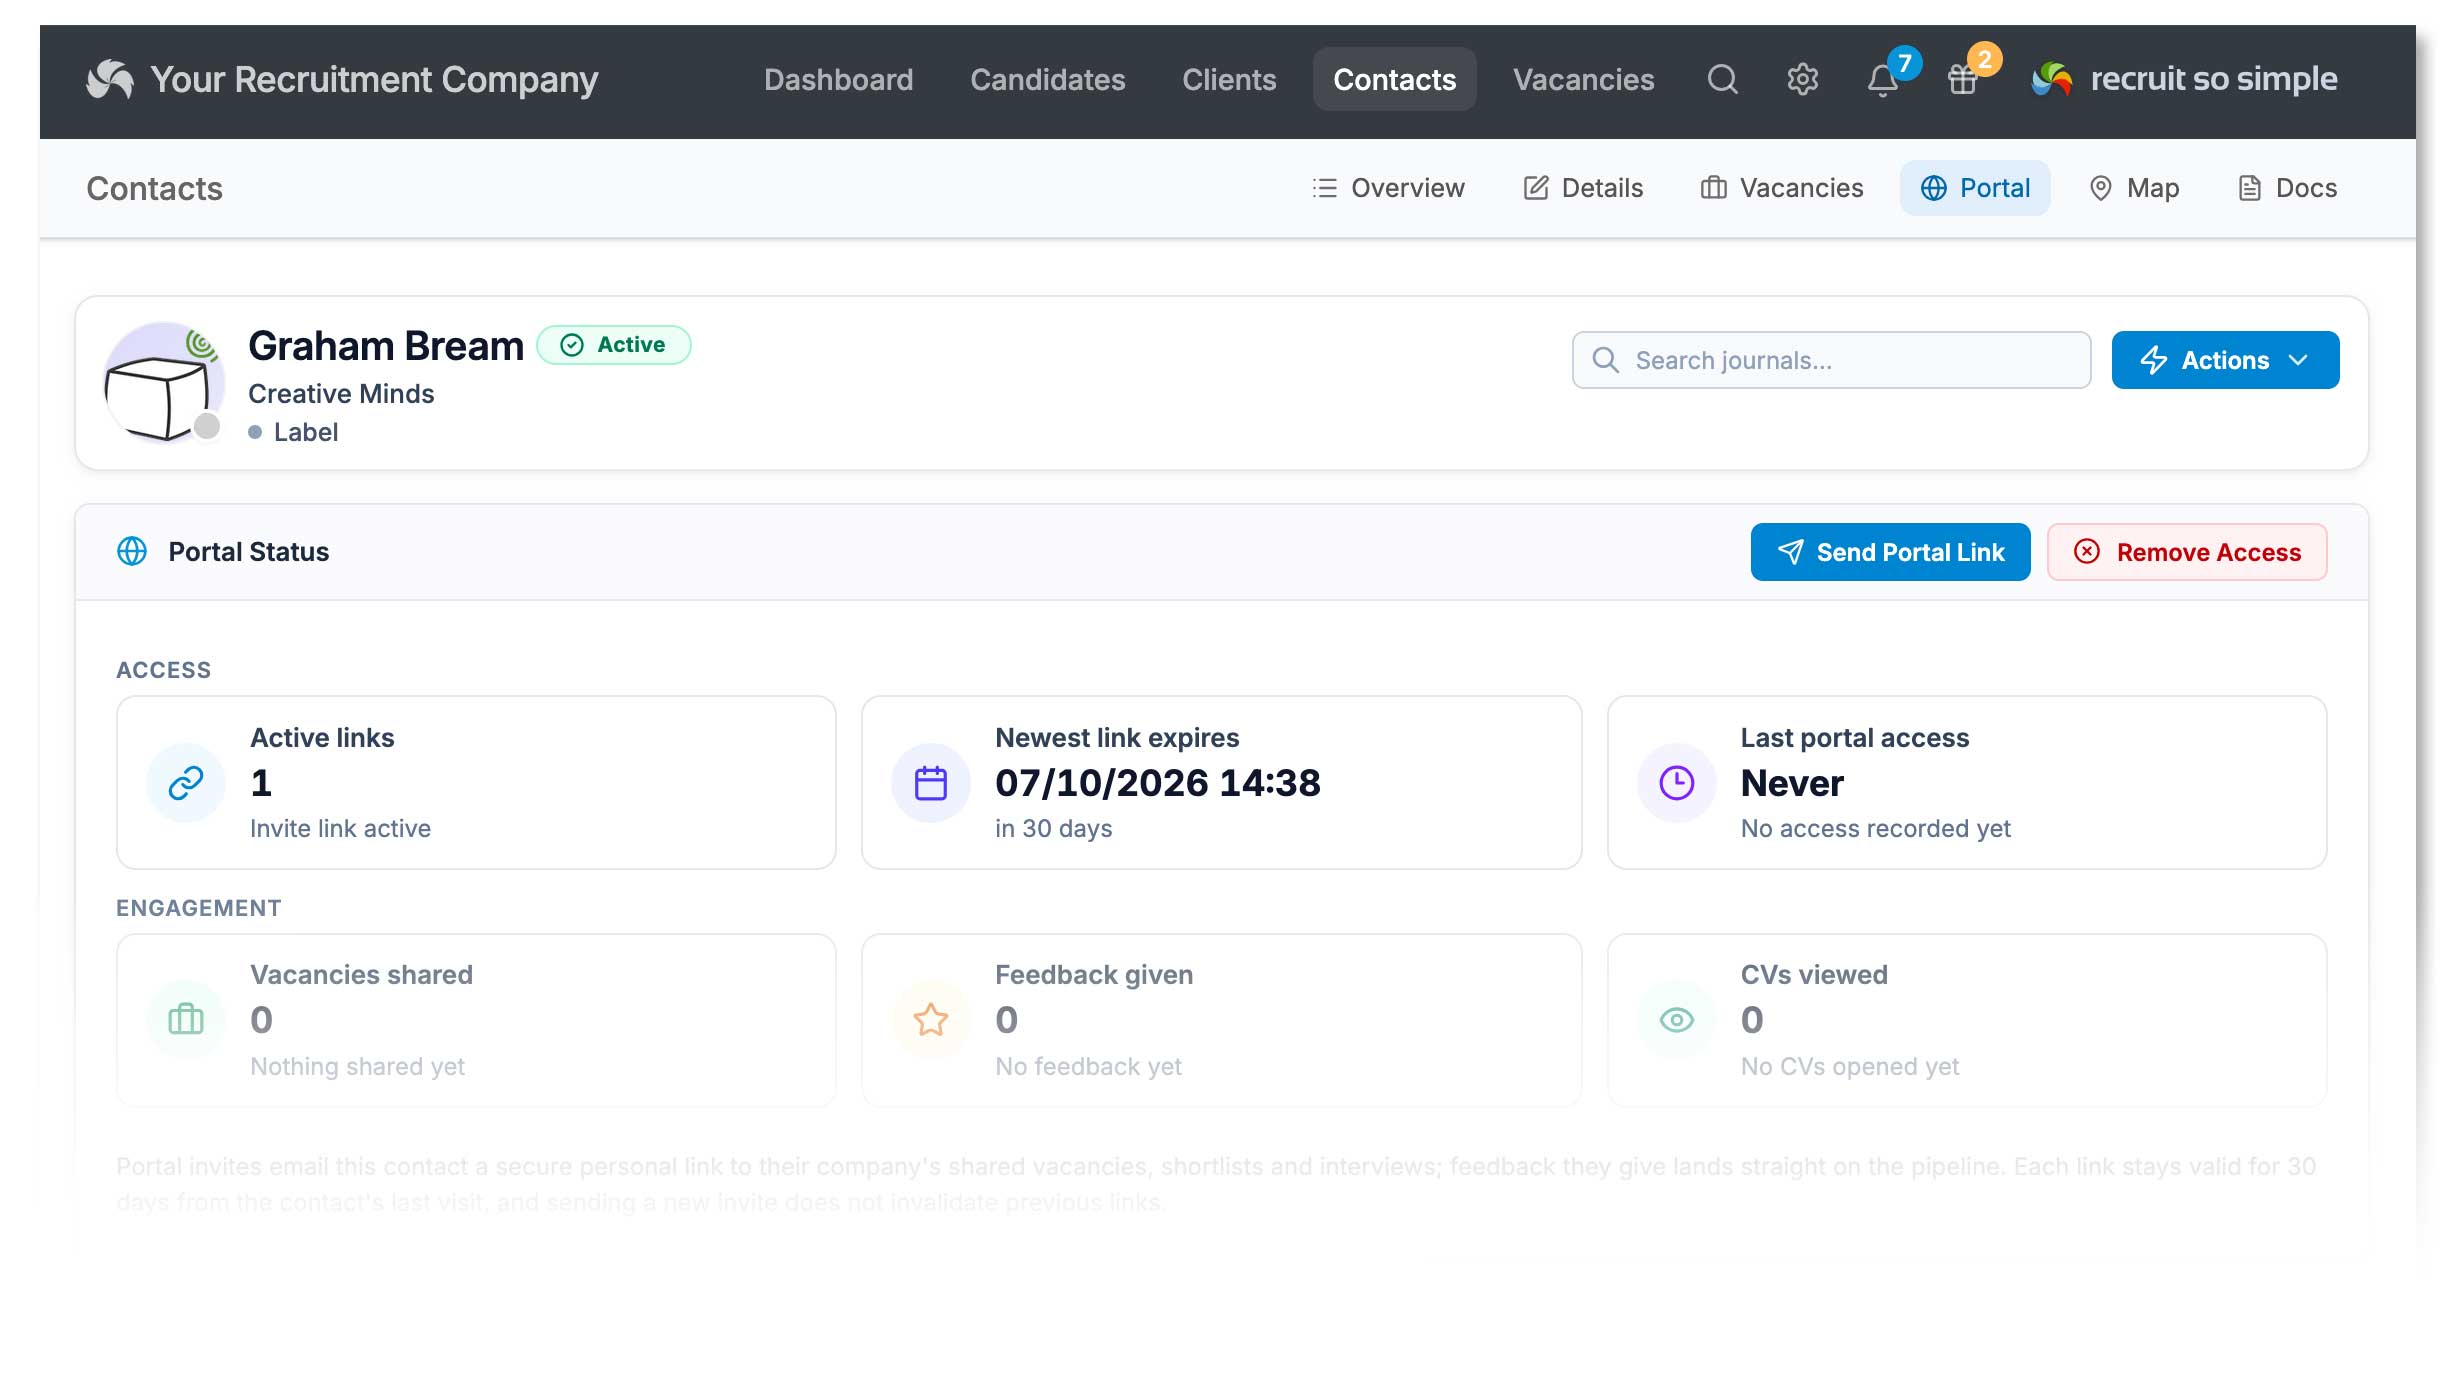
The contact record’s Portal screen has similar functionality to the client record’s portal page, but just for that particular contact.
Vacancy record’s Portal screen
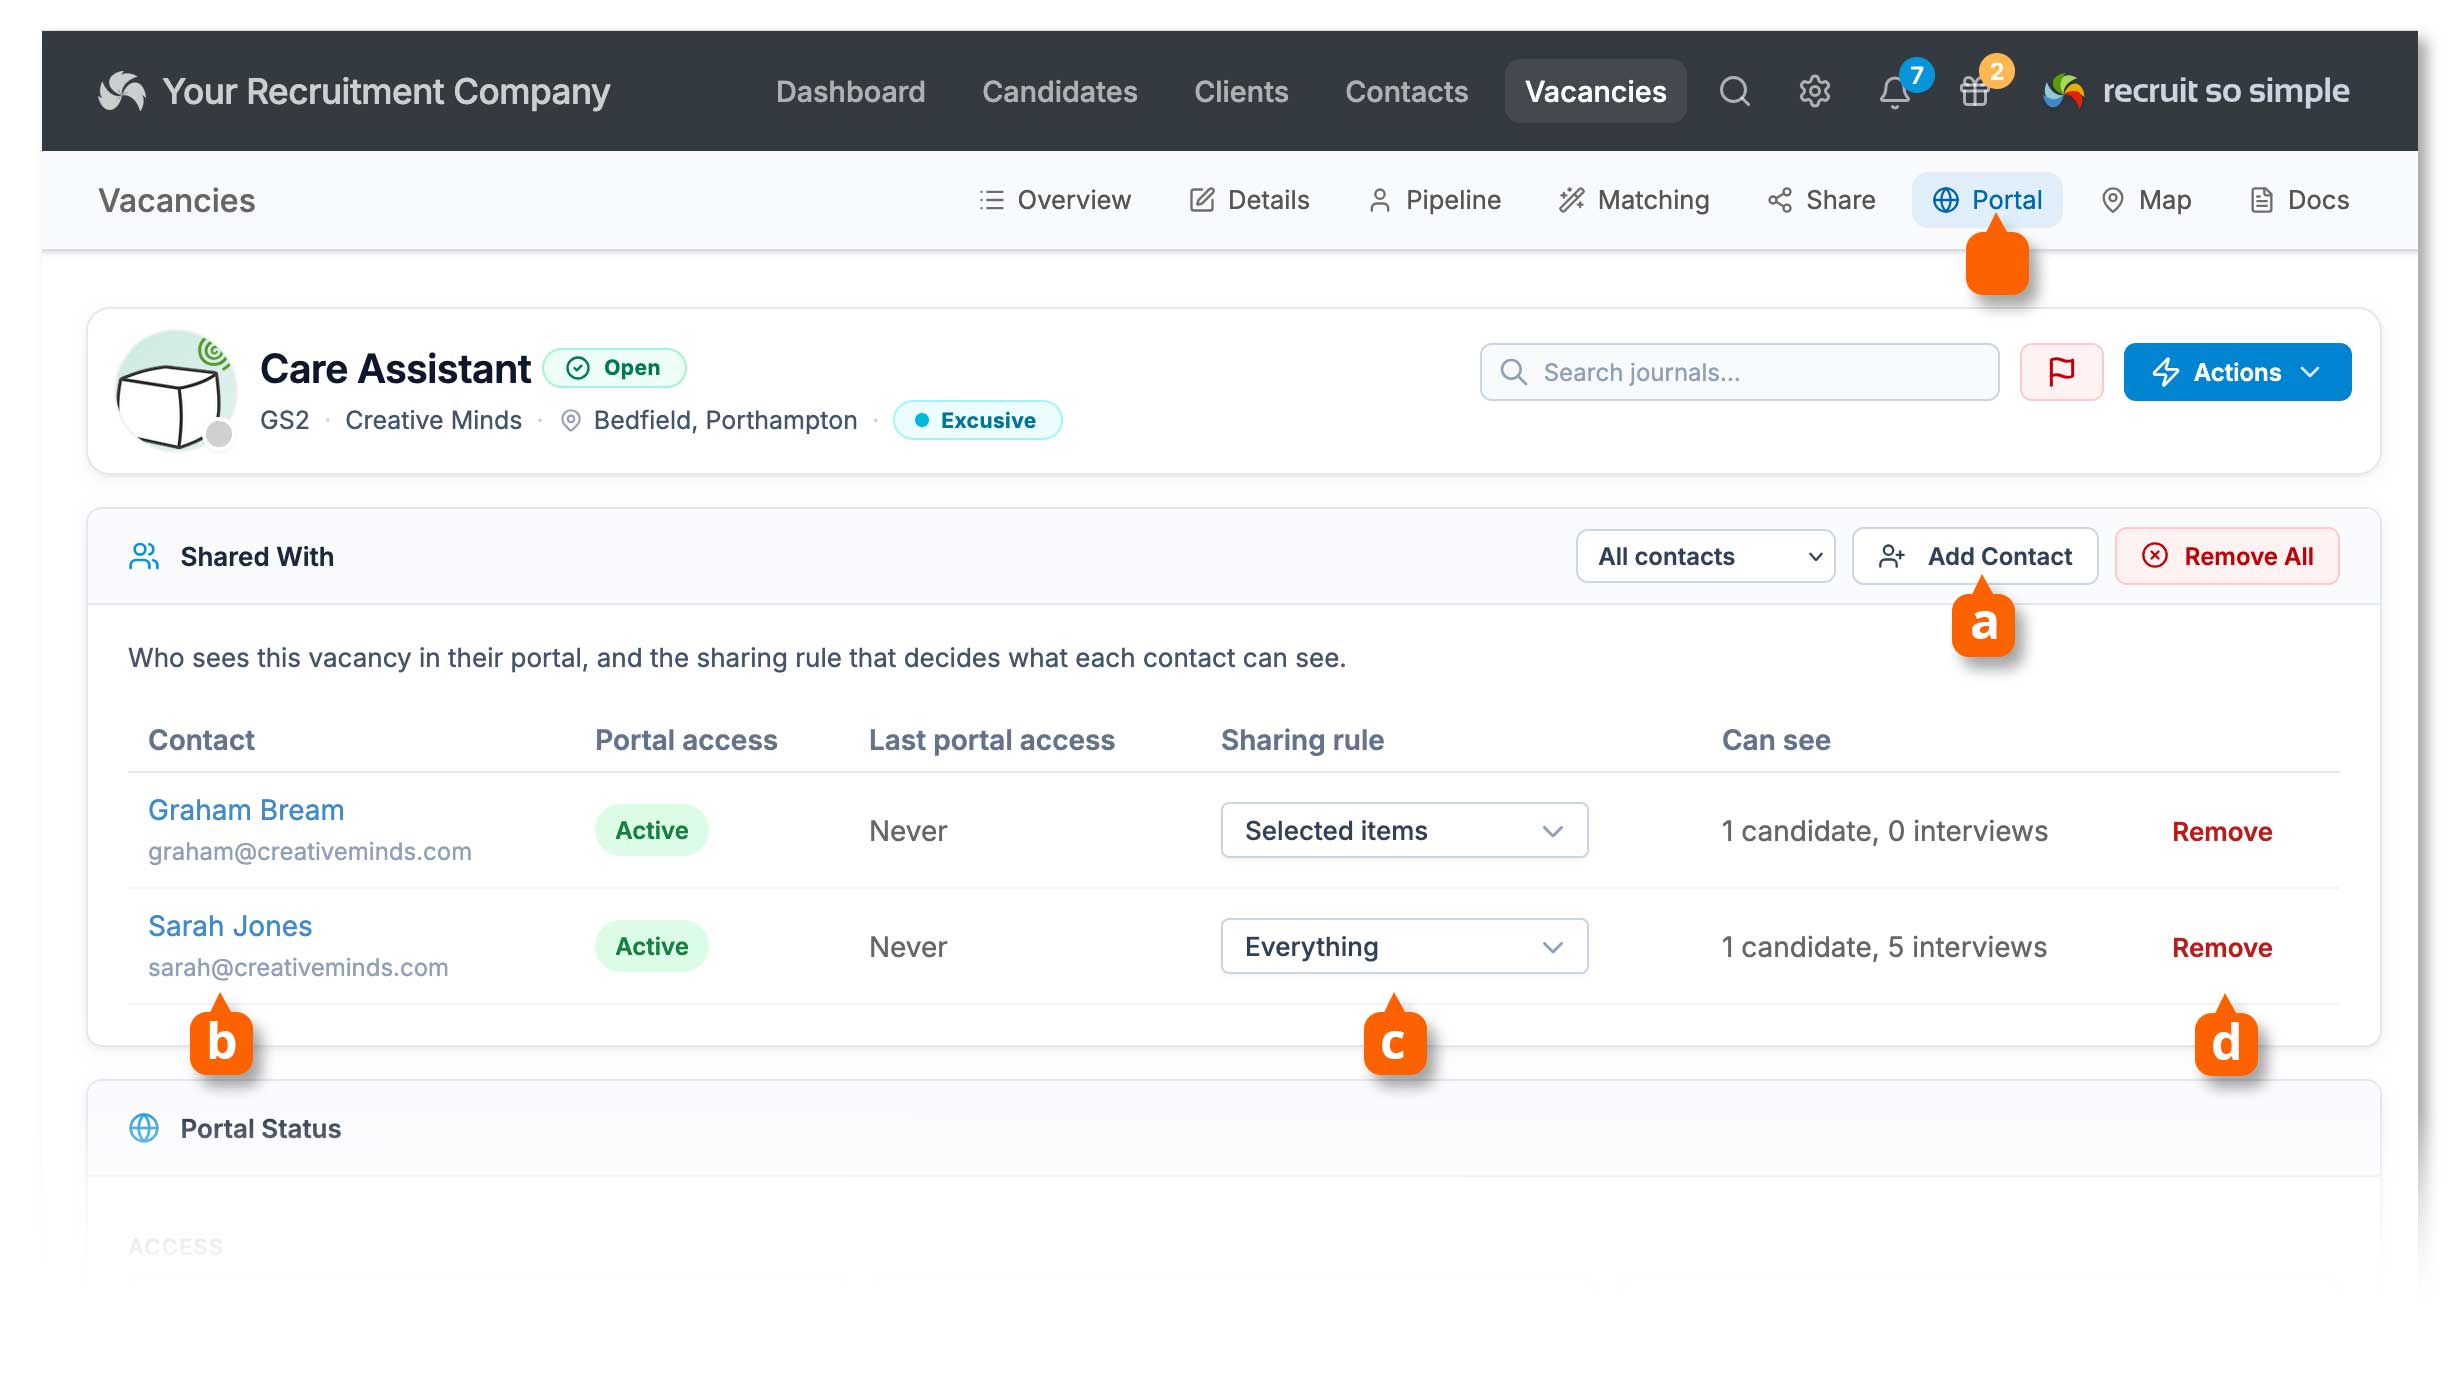
Control Client Portal access and sharing options for an individual vacancy:
- Add contacts to the vacancy [a]
- See which contacts the vacancy has been shared with [b]
- Set the sharing rule for each contact [c]
- Remove a contact’s access to the vacancy [d]
Sharing Rules
Selected Items
The contact only sees the specific candidates and interviews you have shared with them.
Selected Candidates
The contact only sees the specific candidates you have shared with them, and they can see all interviews for the vacancy.
Everything
The contact sees all current and future candidates and interviews for the vacancy.
Vacancy record’s Pipeline screen
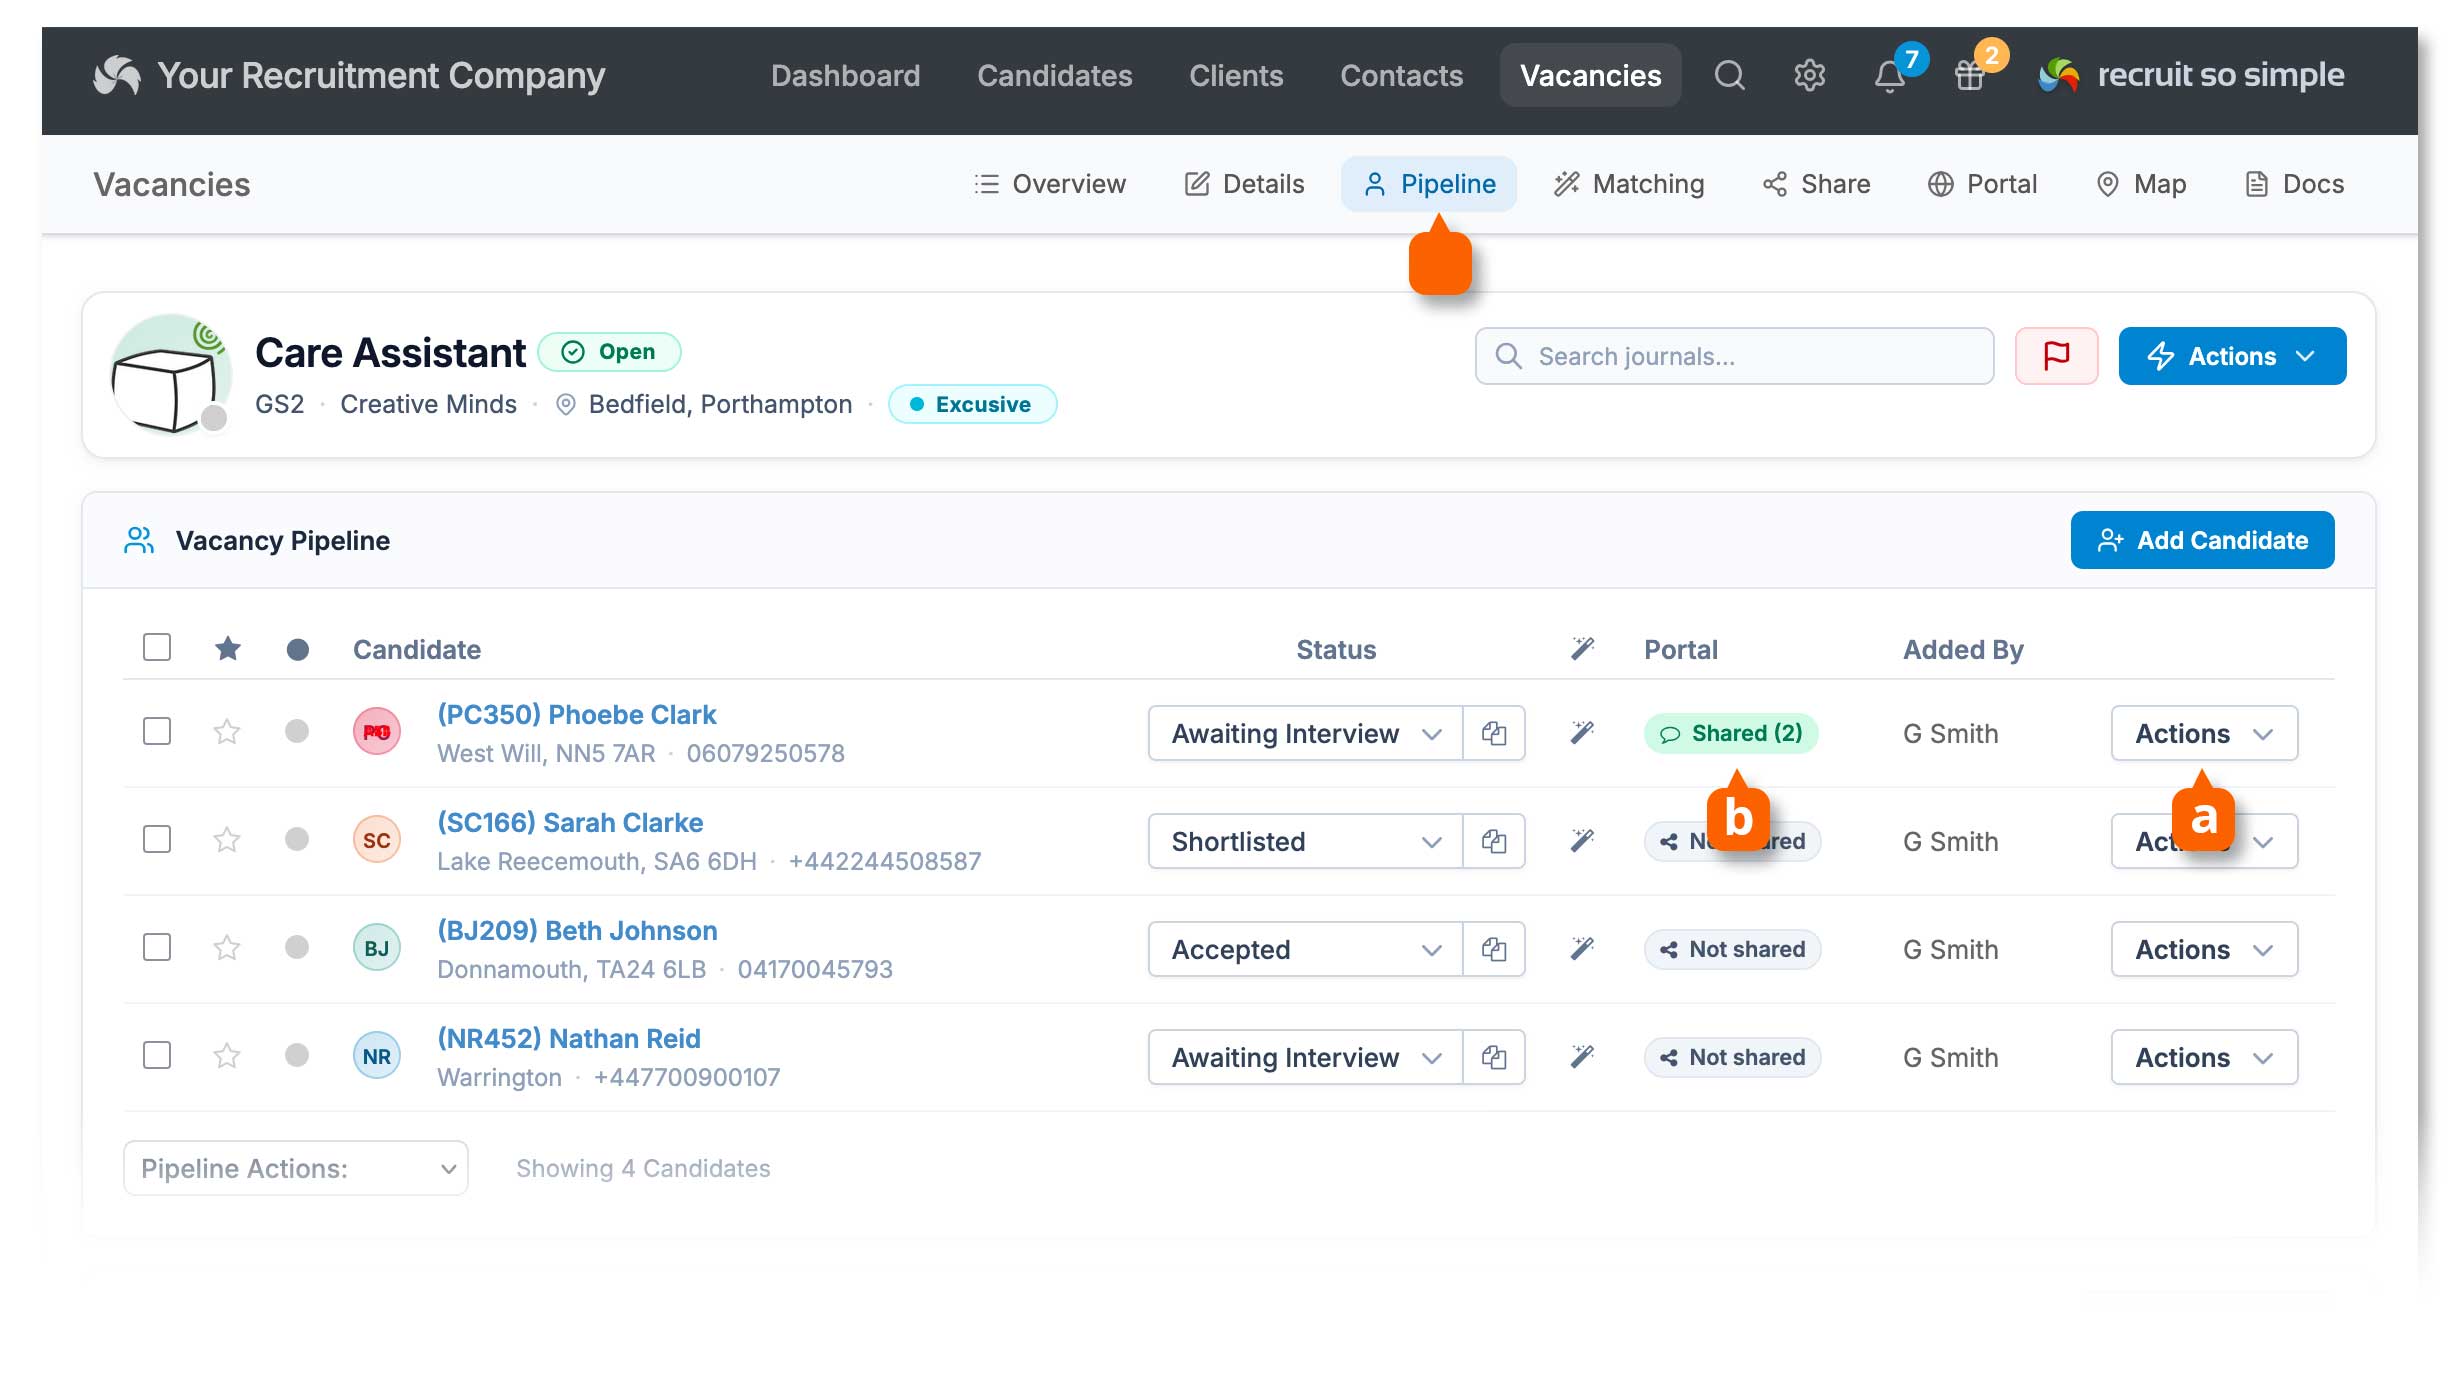
Sharing a candidate
Share a candidate with one or more selected contacts from the Actions menu [a] on the vacancy record’s Pipeline tab.
Candidates are shared anonymously, showing only their first name and the initial of their surname.
To view a contact’s comments and rating (Approve, Maybe or Reject), click the badge in the Portal column [b].
Sharing an interview
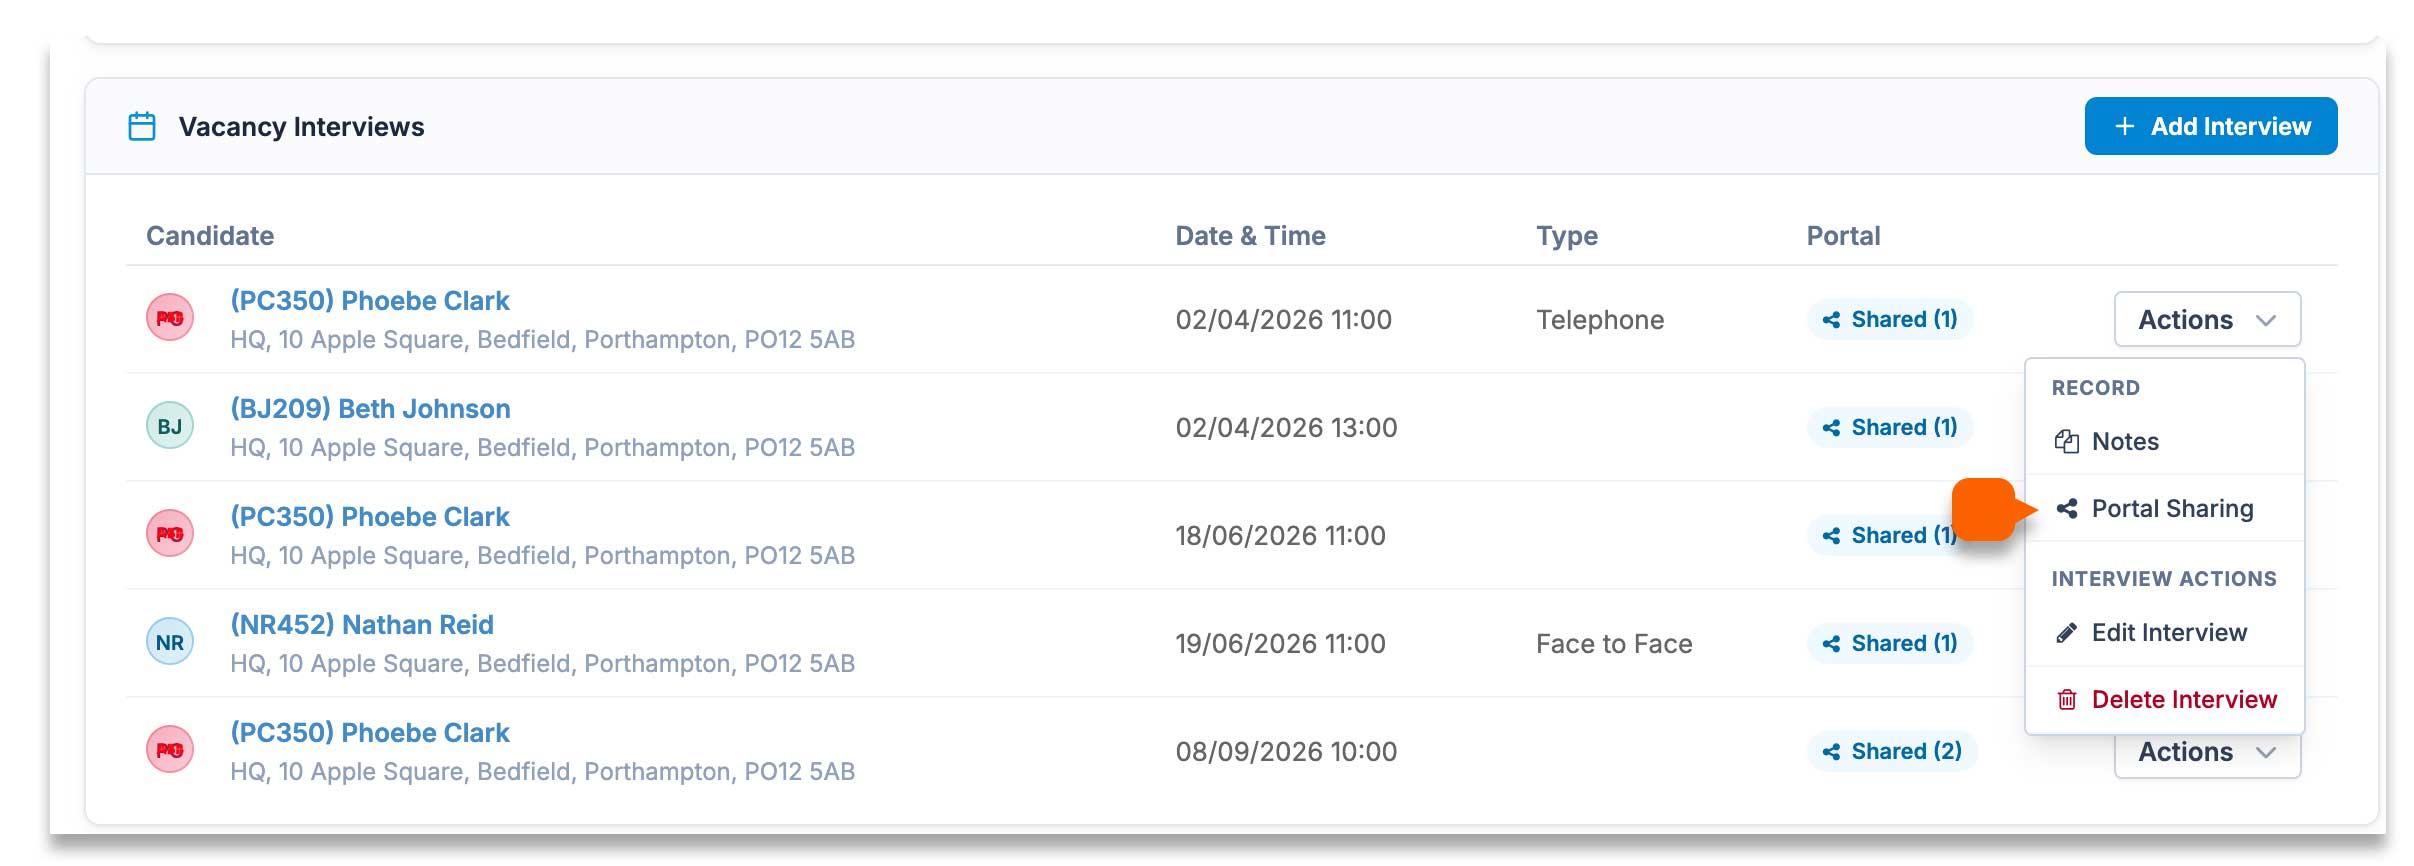
Interviews can be shared independently of candidates.
To share an interview with one or more contacts, select Portal Sharing from the Actions menu for the required interview. Shared interviews will then be visible in the contact’s Client Portal.
Note: The contact’s sharing rule (Selected Items, Selected Candidates or Everything) also determines which interviews they can see. See Sharing Rules above for details.
Automation
In [Settings > Automation], you can create automated tasks, alerts, notifications and other actions triggered by Client Portal activity.
For example, you could automatically create a task or notification. whenever a contact approves or rejects a candidate.
Automations can help you keep track of important portal activity without having to manually monitor individual candidate records.
Follow records to receive portal activity alerts
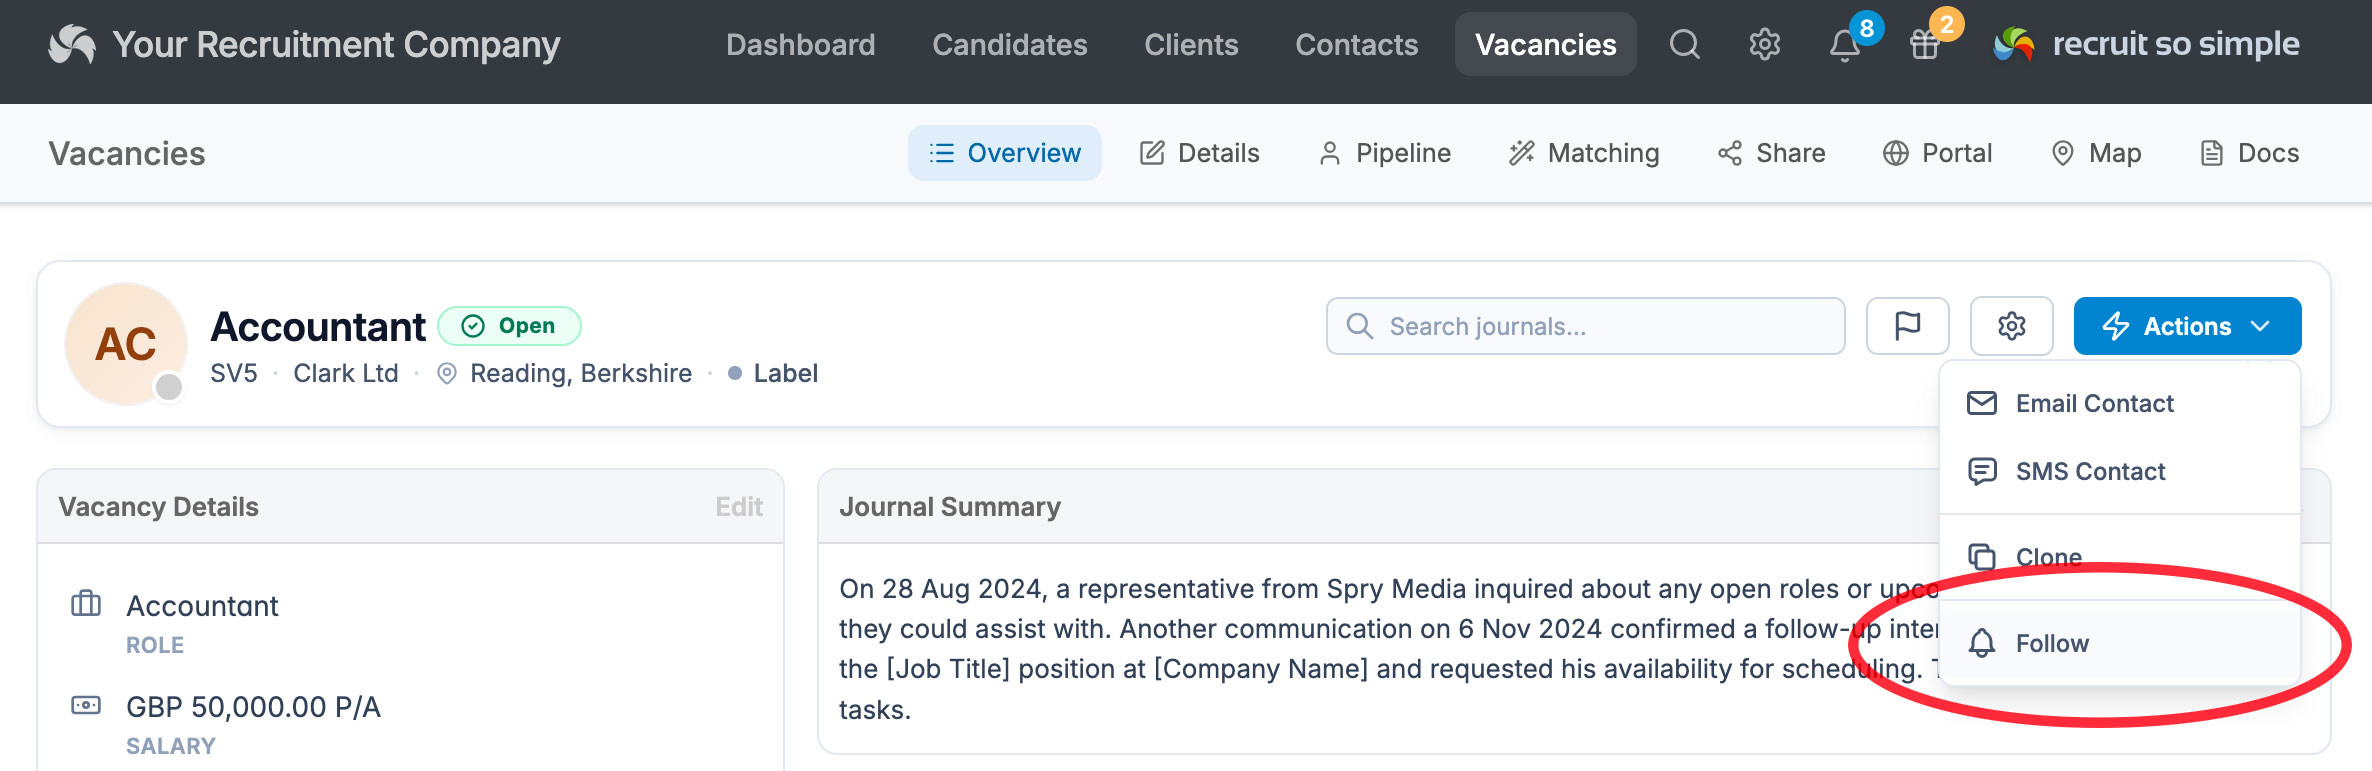
To keep notification alerts and emails manageable for portal activity, you can follow just the client, contact, candidate and vacancy records that you’re interested in.
Follow a candidate record to be alerted when a candidate does something in their or portal. You can choose any or all of the following actions:
- Details updated
- CV Uploaded
- Document uploaded
- Document signed
- Questionnaire completed
- Consent updated
- Deletion requested
Follow a client record to be alerted when a contact does something in their or portal. You can choose any or all of the following actions:
- Shortlist feedback
- Document uploaded
- Document signed
Follow a contact record to be alerted when a contact does something in their or portal. You can choose any or all of the following actions:
- Document uploaded
- Document signed
Follow a vacancy record to be alerted when a contact does something in their or portal. You can choose any or all of the following actions:
- Shortlist feedback
Keeping track of who you are following
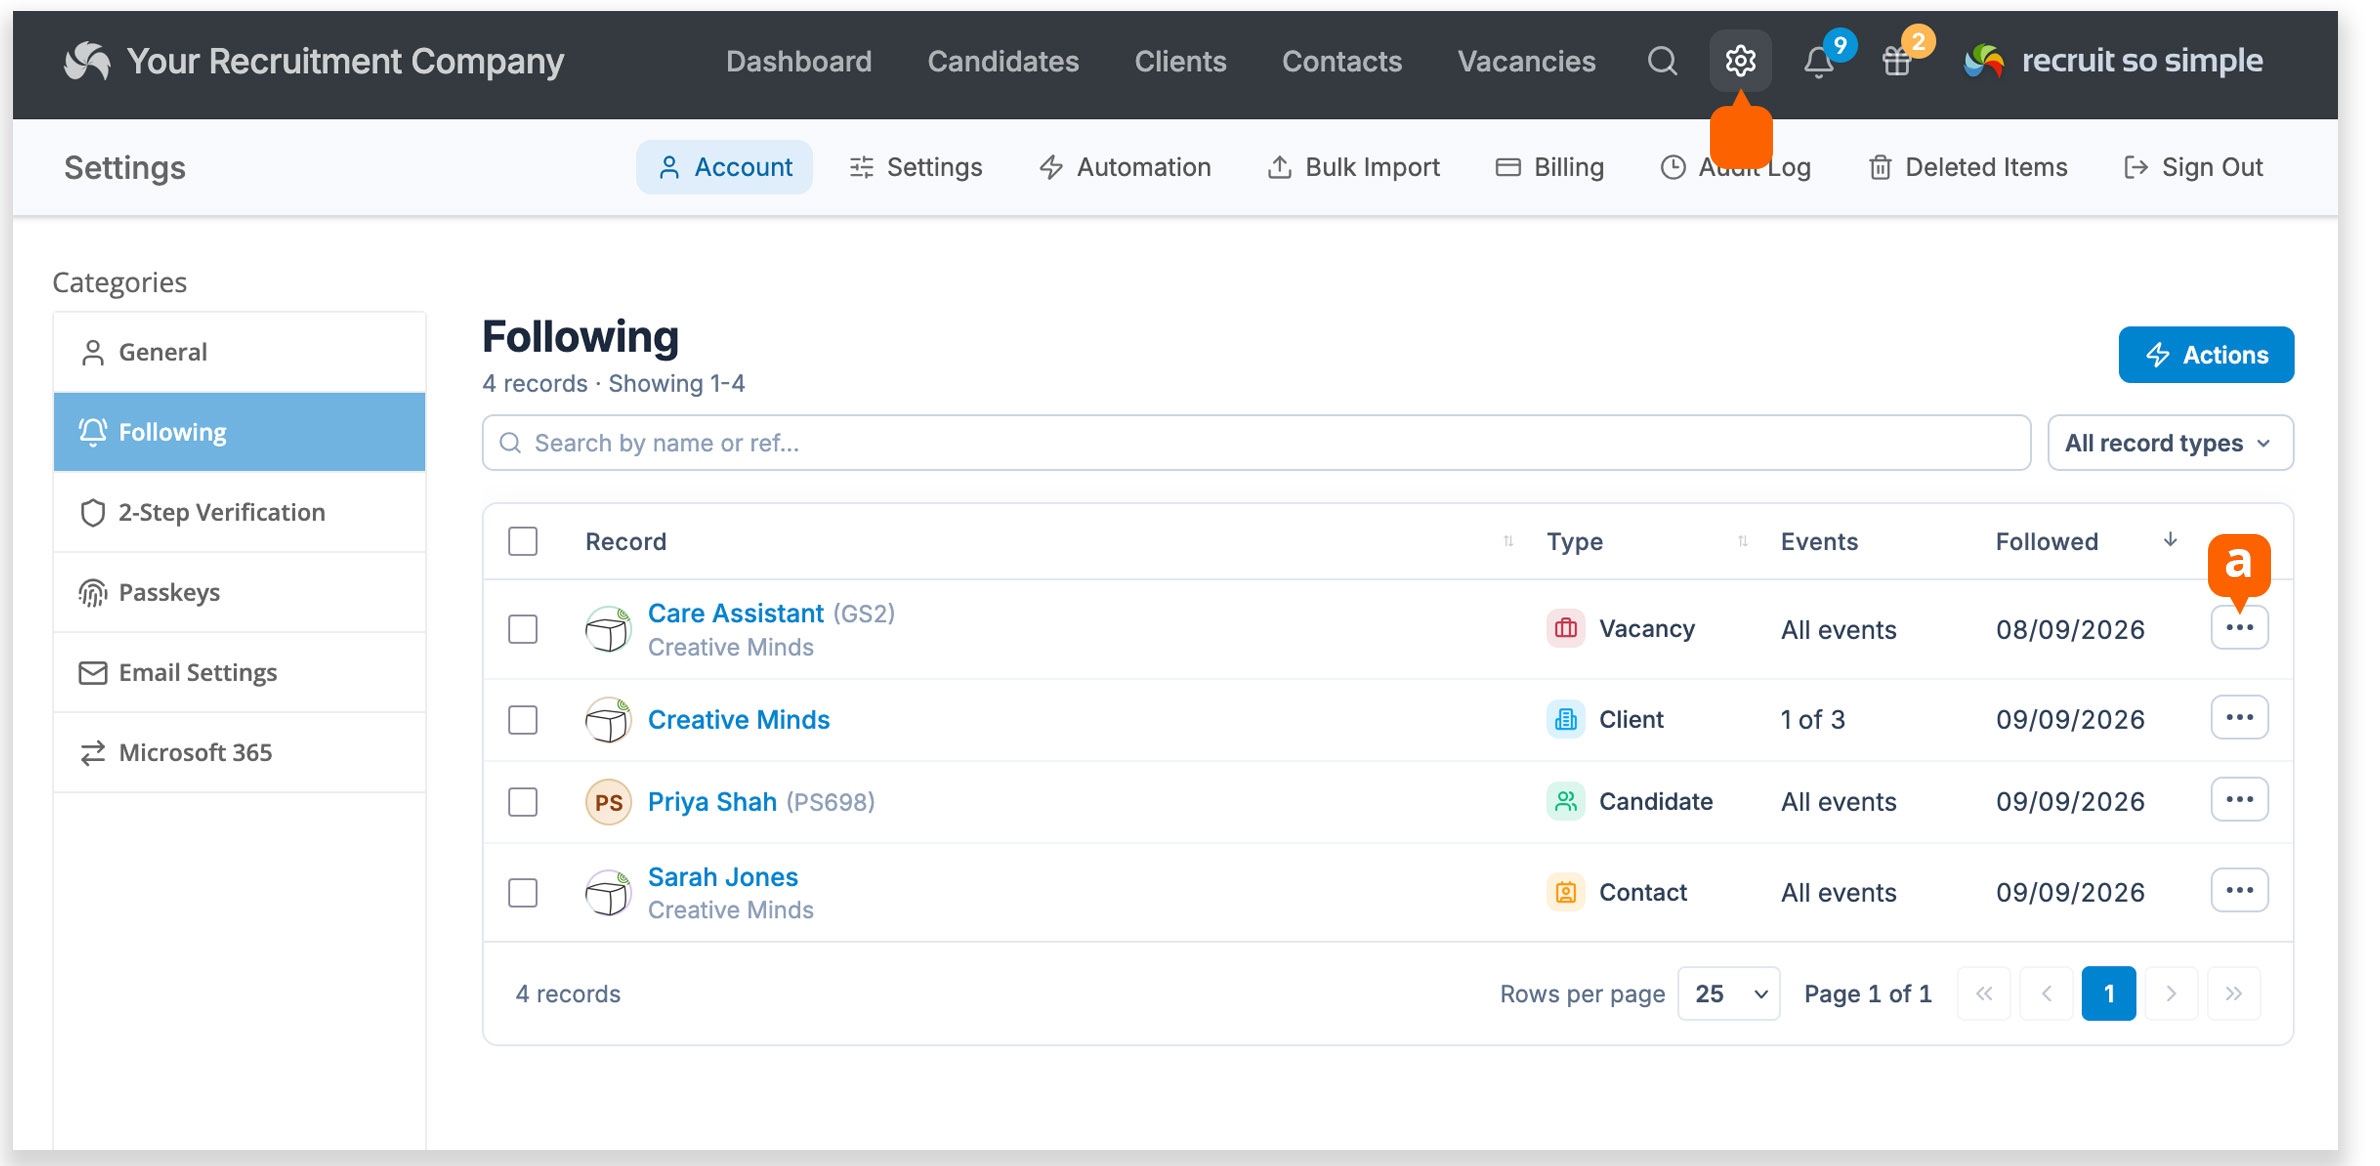
You can review and manage the records you are following from [Settings > Account > Following].
From here, you can choose which events [a] you want to receive alert notifications for, and unfollow any records you no longer need.